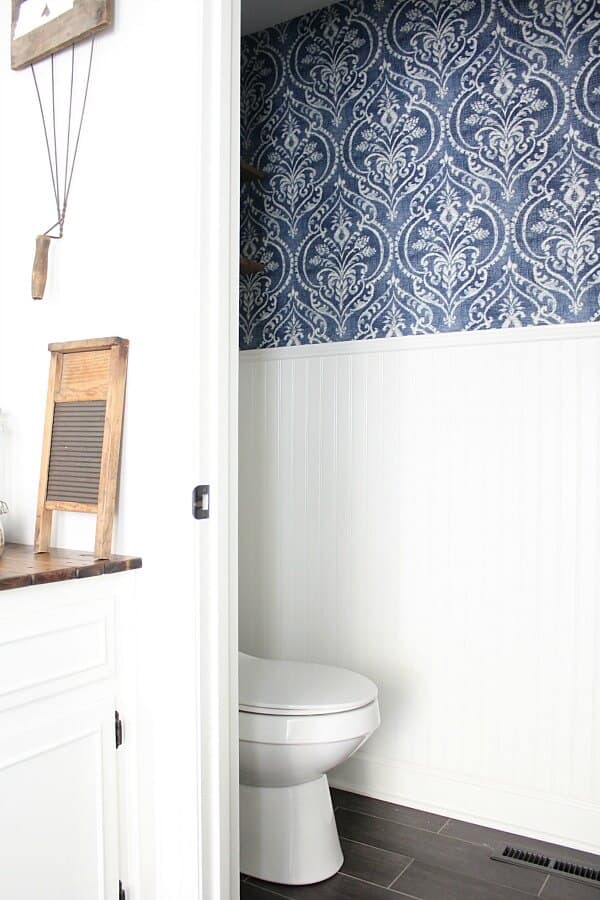
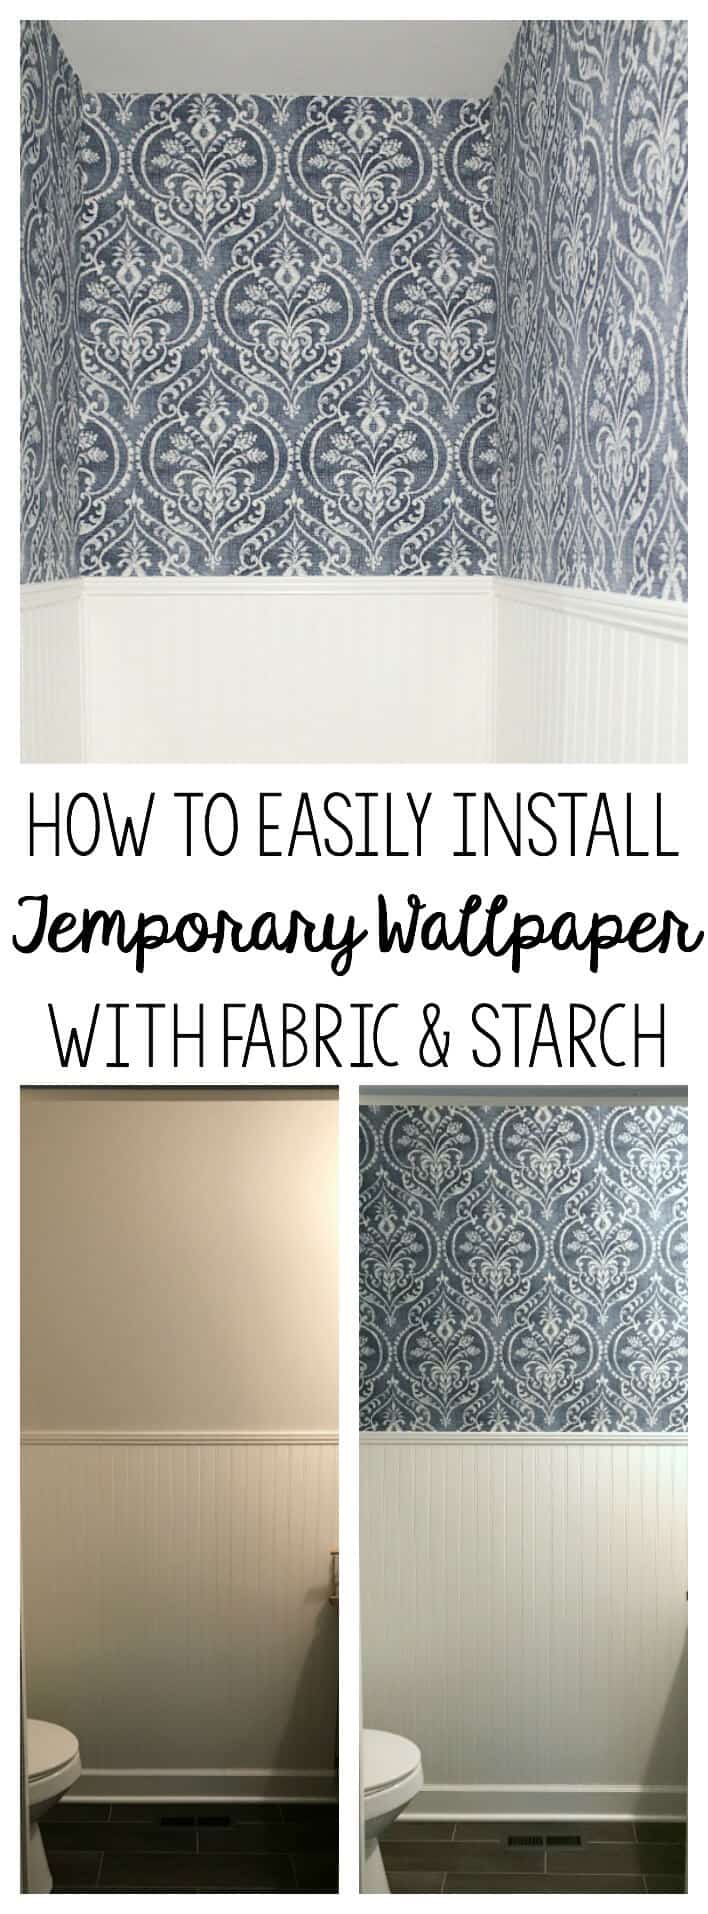
Temporary Fabric DIY Wallpaper Tutorial
For an easy temporary accent wall, this DIY wallpaper tutorial using fabric and starch is great option! Here’s how we used this technique in our half bath.
Wallpaper is so popular right now, but I have a confession.
I’m not a fan of the permanent stuff!
After pulling off the many strips of old traditional wallpaper in our 80s fixer, I have been hesitant to add it back again.
So I went searching for what I can use instead of wallpaper.
I found an easy solution to get the look I wanted without all the stripping mess when time comes to take it down.
Here’s how we took fabric and a bottle of liquid starch and transformed it into wallpaper.
First, let’s start with the supplies.
Temporary Fabric DIY Wallpaper Tutorial
(Some affiliate links are provided below. Full disclosure here.)
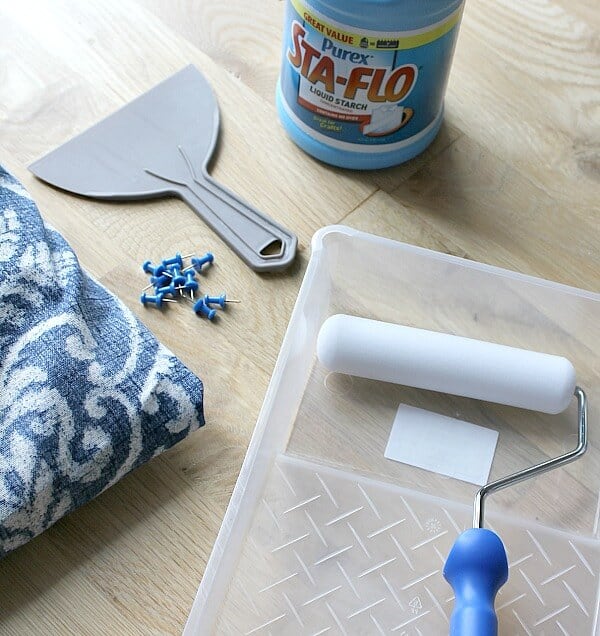
SUPPLIES
- Fabric – I used Swavelle/Mill Creek Dalusio Damask Denim
I ordered 7 1/2 yards for our half bath which measure 3 ft x 7 ft. - Liquid Fabric Starch (this room took almost 2 containers)
- Sharp Scissors
- Paint Tray
- Foam Paint Roller
- Push Pins
- Spackling knife
- Folding Razor Utility Knife
- Towels
- Drop Cloth
- Tape Measure
Step One: How much fabric do you need for diy fabric wallpaper?
Figuring how much fabric you need is the first step in this process and it’s very crucial to take the time and do the necessary math.
You don’t want to get halfway through the project only to find that you don’t have enough fabric for the entire wall.
Here’s a breakdown to help calculate exactly the amount you’ll need.
First figure how many fabric panels you will need:
Measure every wall in the entire room.
Room in total inches wide divided by the width of the fabric you are ordering
example: 3′ x 7′ room – 240 total inches inches wide ÷ 54 inches wide
= approx 4 1/2 panels needed.
Next you figure the each panel length:
Height of wall in inches + 6 or 8 inches allowance for shrinkage x how many panels
example: 42 inches tall + 8 inches = 50 inches x 4.5 = 225 inches
Then convert the inches to yards to see how much fabric to order:
example: 225 inches divided by 36 = 6.25 yards of fabric
Always round up to the nearest whole number to ensure you have enough fabric.
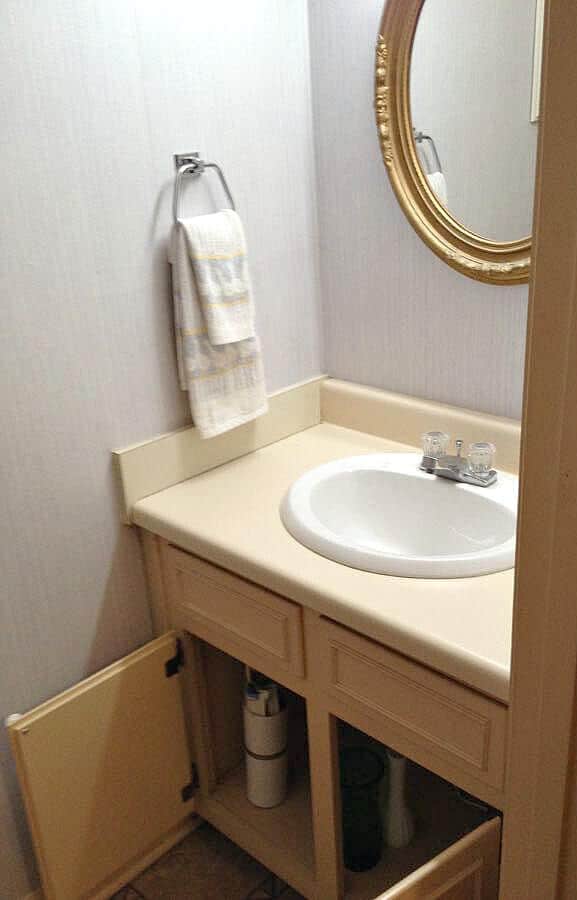
We were only applying fabric to a half wall in our powder room.
For my half wall, I needed 42 inches of fabric from the ceiling down to the top of my beadboard.
I was able to get a great price for my fabric so I ordered an extra yard in case of any goofs that might happen! The fabric I ordered arrived last week and I’m in love with how it looks!
TIP: When you are figuring how much fabric you need, be sure to factor in for shrinkage. I added 6 inches to the top and bottom that I will trim off. As the starch dries, it will shrink just a bit! For my room, this is how I calculated the amount to order.
Once your fabric arrives, you can toss it in the washing machine if you need to.
But honestly, I didn’t wash mine first. I did take time to iron any wrinkles that may be prominent in the fabric.
Step Two: Figure Out Your Starting Point
This was the tricky part for me.
I was trying to avoid a seam in the view from the door.
But no matter how I worked around the light fixture, the seam was visible. I must have moved that first panel a half dozen times until I finally found the best starting spot.
Since we are hanging a vintage medicine chest over the sink, this seemed to be the logical place for first start hanging the fabric.
This made cutting around that fixture a breeze!
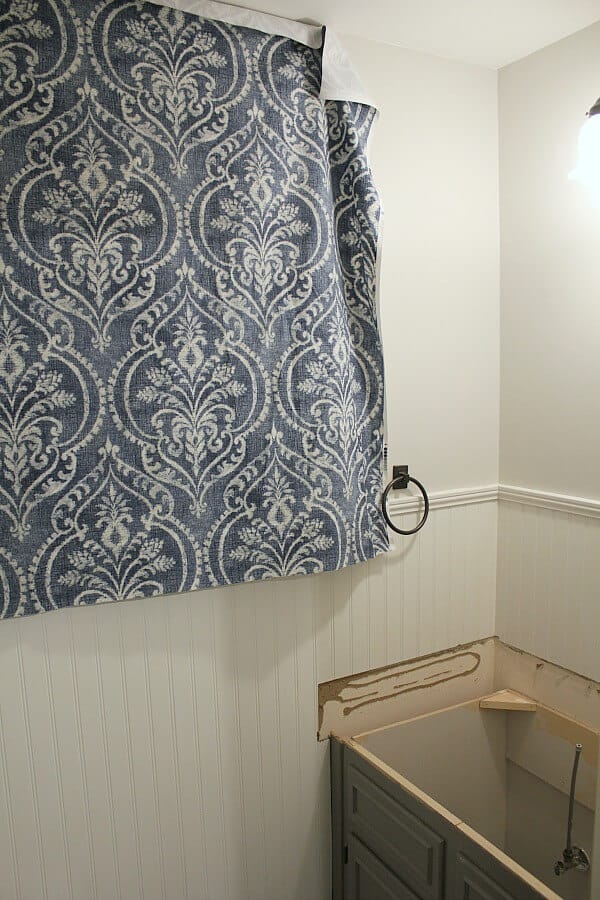
Step Three: Sizing and Hanging
So you have the right amount of fabric and you’ve figured out where to start and finish.
Now comes the fun part – hanging it!
First, you pour the starch in the paint tray and roll, or size, the walls with the liquid starch. Just note that this can get messy.
Liquid starch is not the same consistency of paint or heavy-duty paste and splashes and drips will happen.
I kept a towel handy to catch any drips or splatters as well as a drop cloth on the floor.
The good news is that it smells awesome! Like fresh laundry!
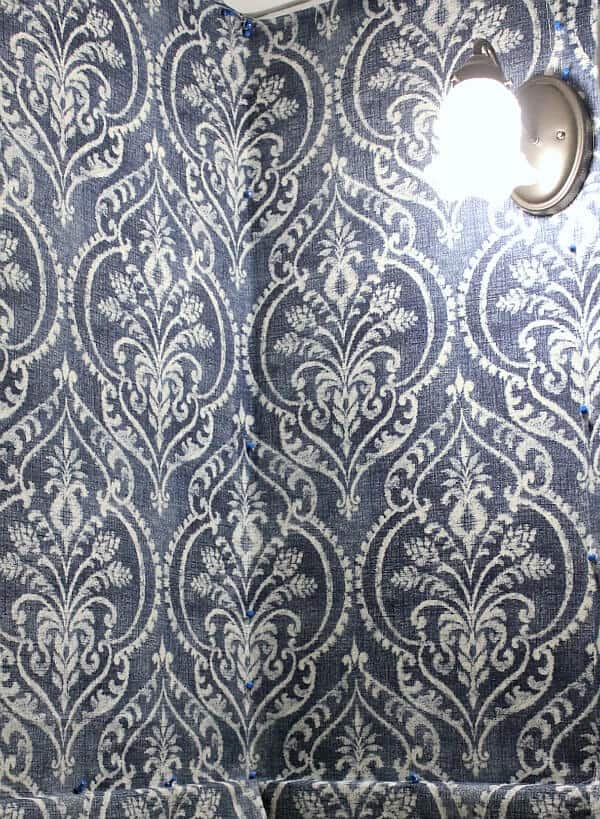
I started at the top of the wall with about 1 inch hanging over the top.
Working in small areas, you simply secure the top of your fabric panel to the starched wall with thumb tacks. My fabric was cotton and will hide the pin holes very easily.
Something to consider: Make sure you have lightweight fabric.
It will make the biggest difference in how easy it is to handle in addition to how well it will adhere to the wall with the starch.
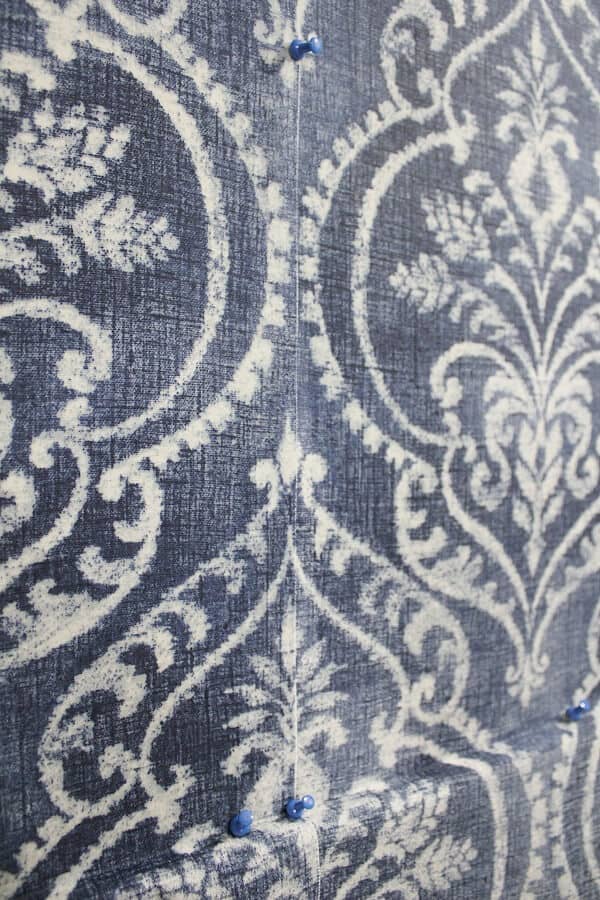
I placed each pins about 6 inches apart starting at the top.
You could use heavy duty straight needles if you think push pins will leave too big of a hole in your wall.
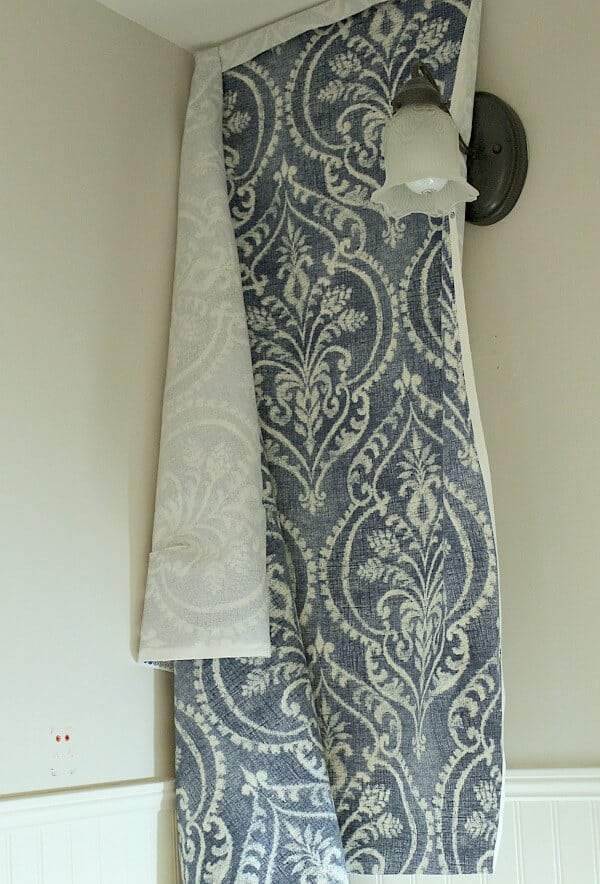
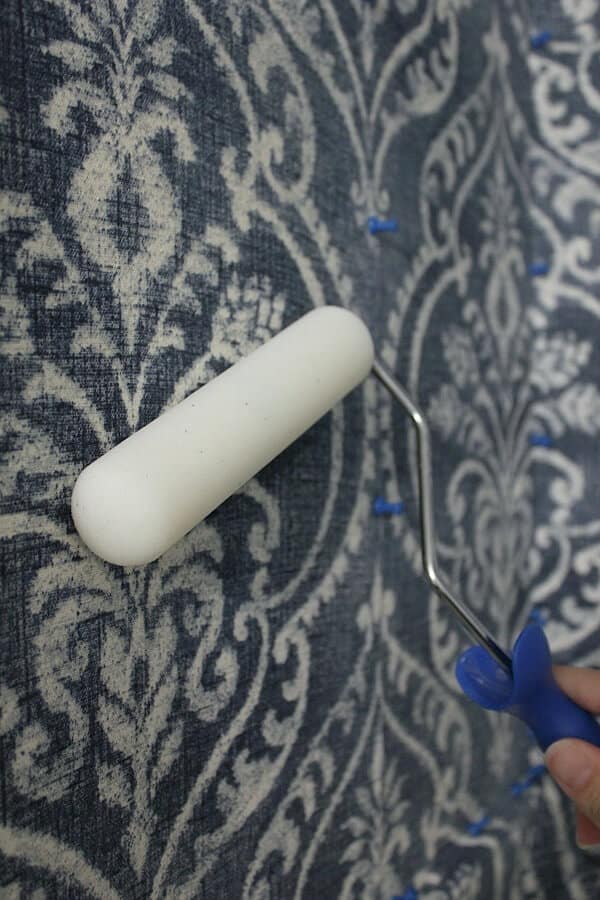
The next step is to roll the fabric with the liquid starch.
You want a smooth wall, so make sure it’s thoroughly saturated.
I started at the top of the wall and worked my way down, adding push pins along the way.
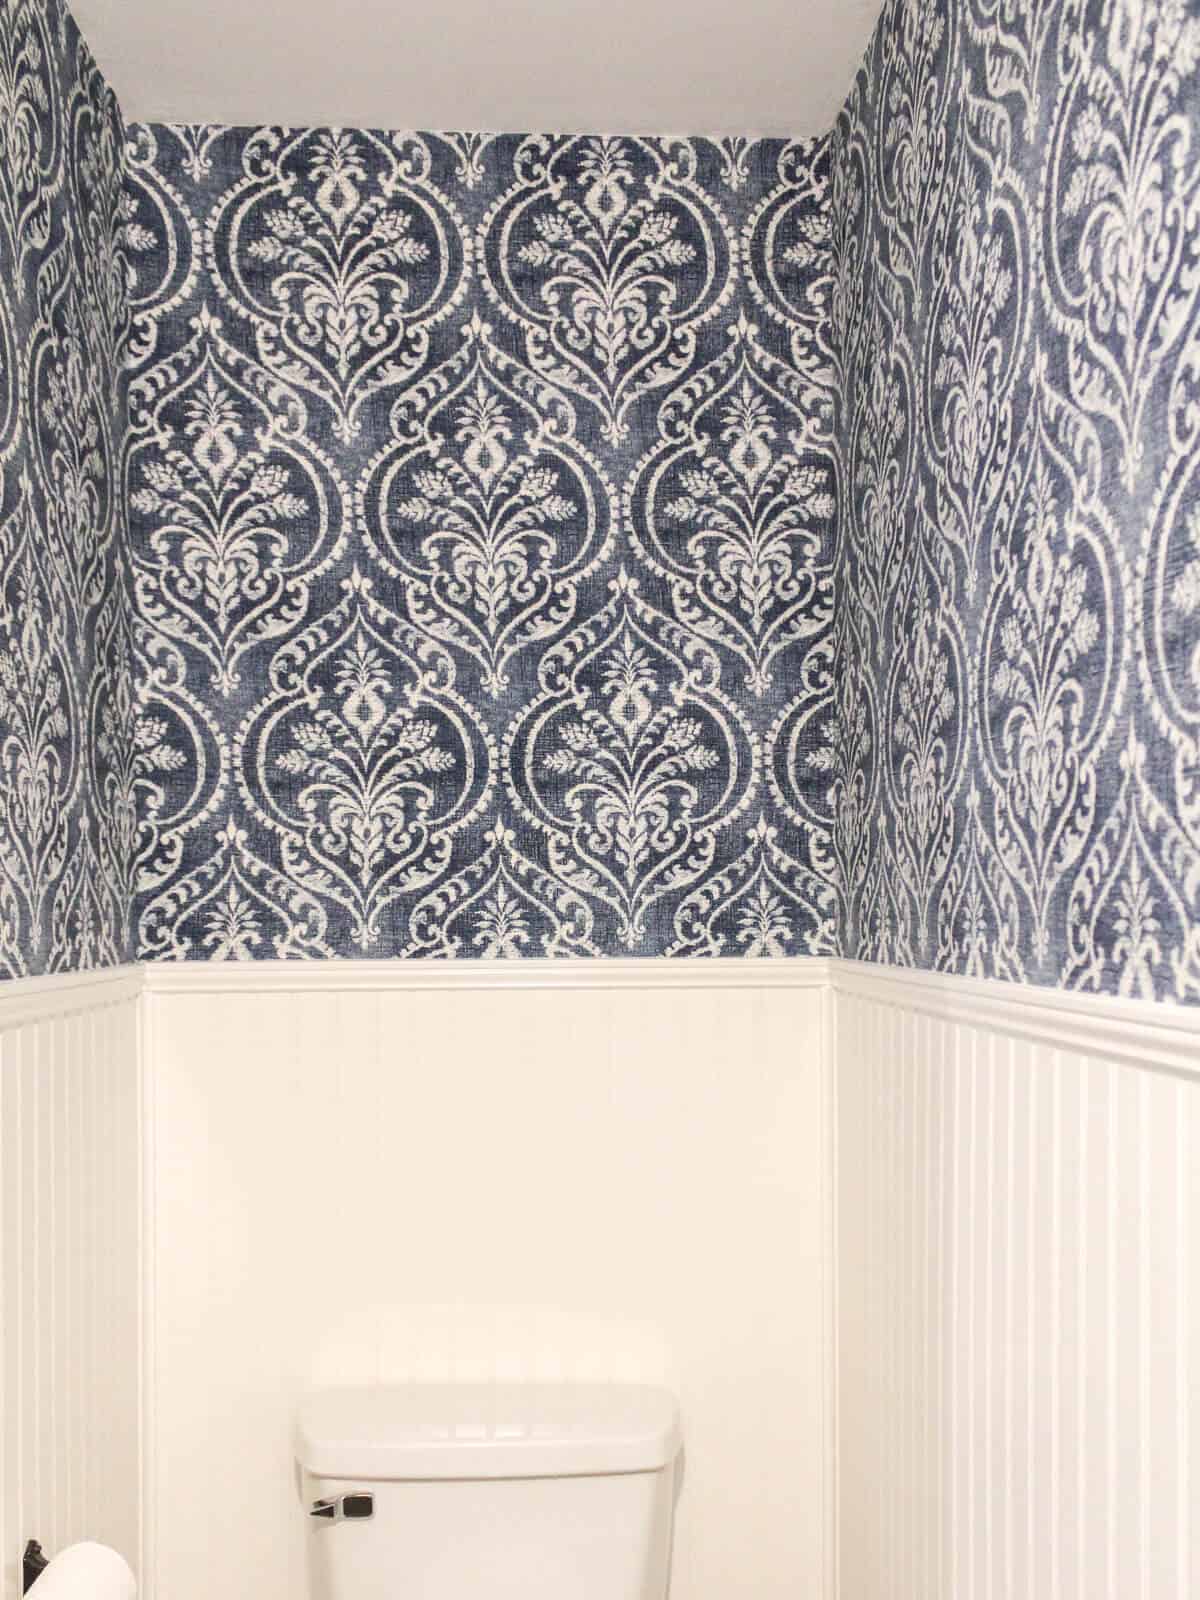
When it’s time to hang the next section, make sure you line up the pattern so that any geometric patterns match.
You may have to cut the selvage edge off the sides depending on the type of fabric you purchase. A sharp rotary cutter is a good way to get a clean, straight line.
Continue working in small sections until each panel is hung. Don’t be afraid to ask for an extra set of hands if you come across a tricky spot.
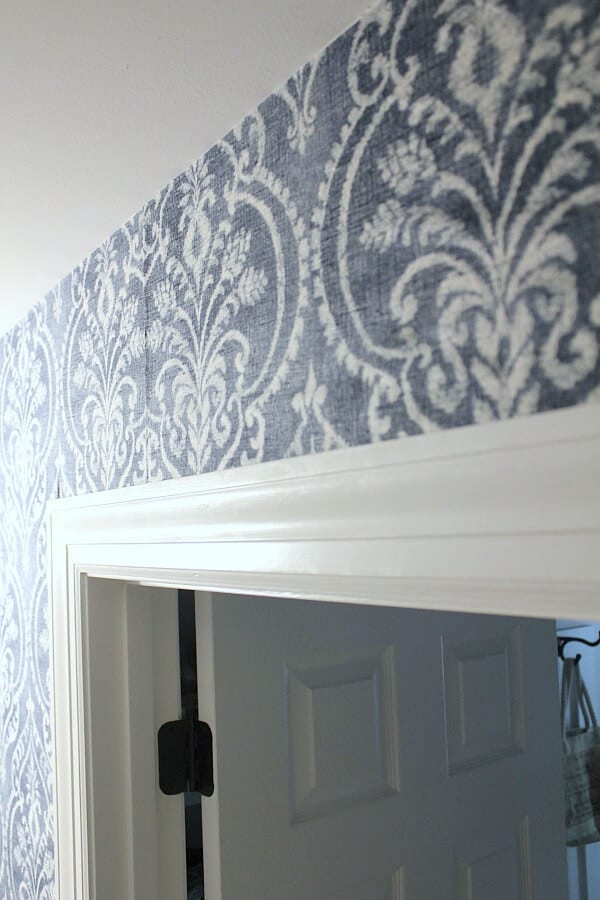
My tricky area was over the door where the patterns didn’t match up.
It took some thinking and extra cuts until I was able to figure it out.
But this is exactly why you need to order extra fabric! That saved me a huge mess up!
As you work around the room, you may need to add more starch and take a putty knife to the corners. As the fabric dries, it may pull away from those areas if you don’t secure them properly.
Then, you let the fabric dry overnight.
Or you can be like me and continually babysit it to see how it’s doing. I finished at around 4:30 one afternoon, and kept going in and out until bedtime!
Step Four: Trim the Excess Fabric
Once your fabric is fully dried, you are now ready to trip the excess fabric from the top and bottom of each panel.
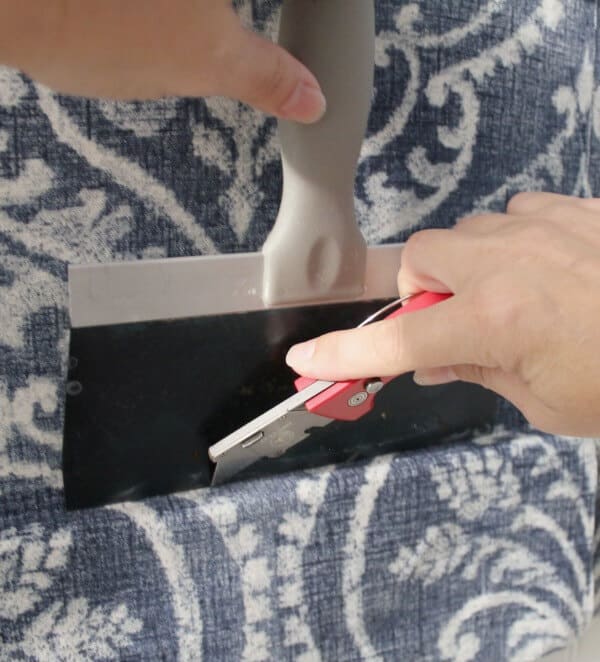
I took a metal spackling tool to create a sharp edge to run a utility knife against to create a straight cut.
Without a doubt, a fresh razor blade is a must for this step.
Another tip is to have a folding blade, especially when you are working with a ceiling line. This one is a favorite of ours.
I almost toppled at one point and was quite thankful that the blade was not open!
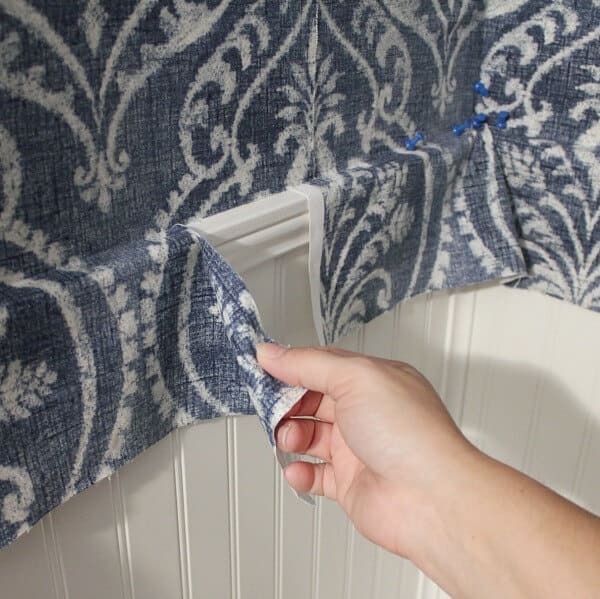
The fabric easily pulls away, leaving a fresh, clean straight edge. This also works really well around any light switch plate and outlet covers.
Follow this for each panel, removing the push pins as you go.
So do you wanna see how it looks???
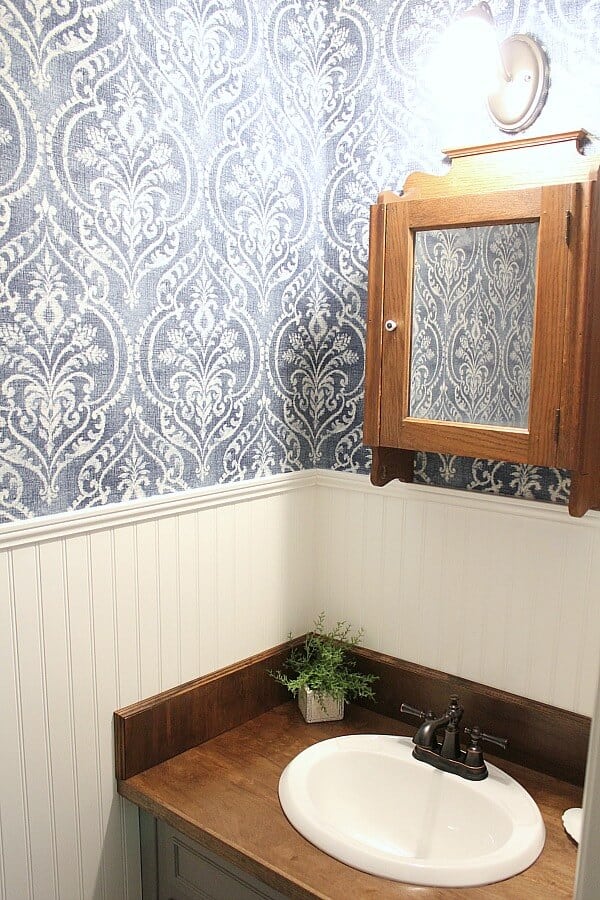
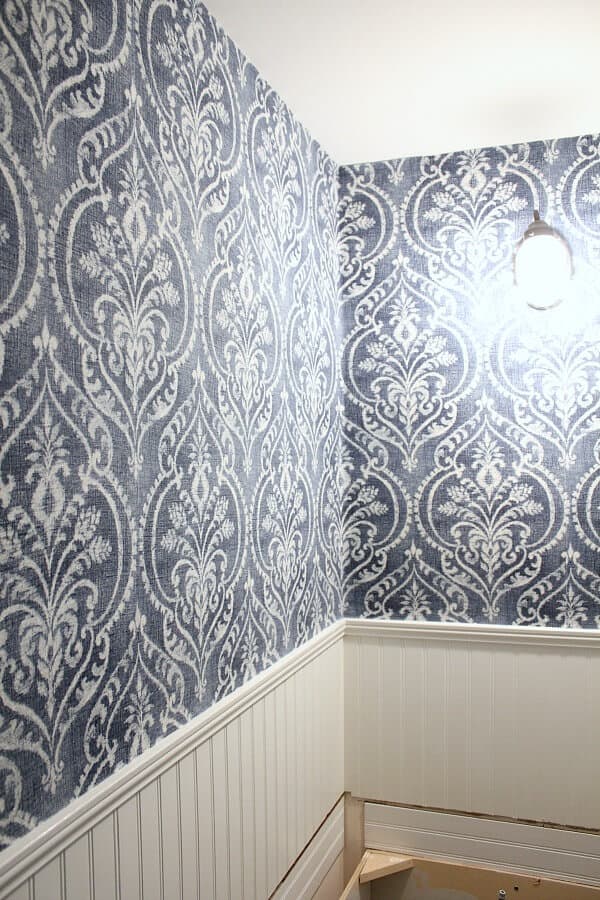
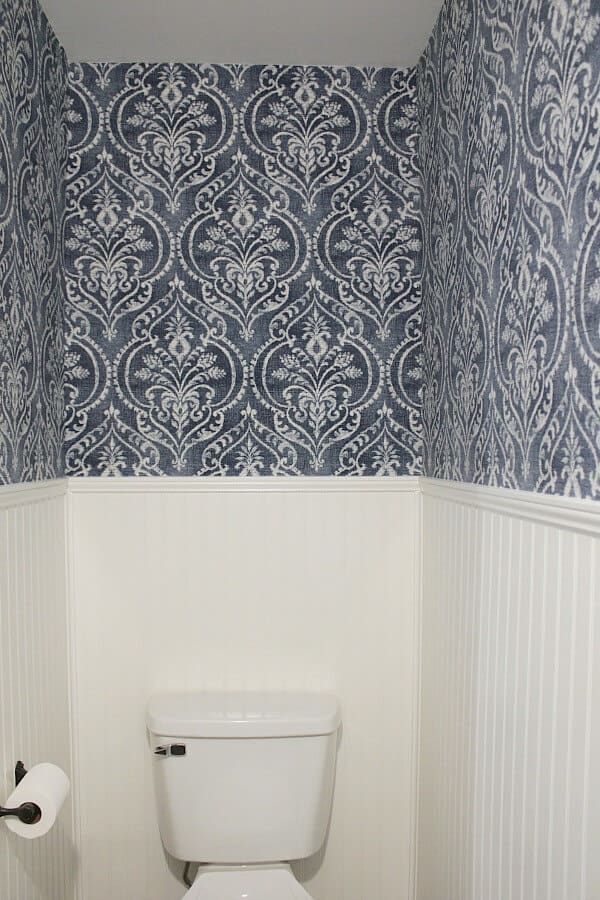
What a transformation!
Taking only one day to install, this is undeniably one of the easier DIY Projects we’ve tried.
But all DIYs have their problems. There were a few issues that I came up against.
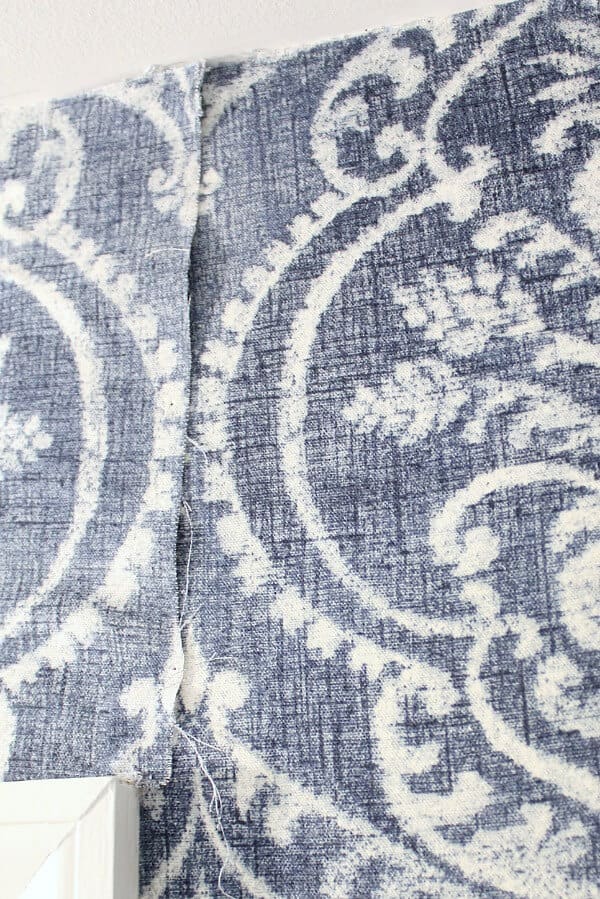
I had to remove one panel because my pattern didn’t line up with my beadboard.
So I disguised the seam over the door.
All in all, I love my temporary fabric wallpaper!
I especially love how instantly warm the room feels – which is tough to do in a bathroom!
Even though the seam falls in the middle of the wall, it doesn’t bother me. It’s barely noticeable unless you are really looking for it!
Total Spent for this project: $82
Not bad for a temporary solution for wall covering that looks absolutely amazing!
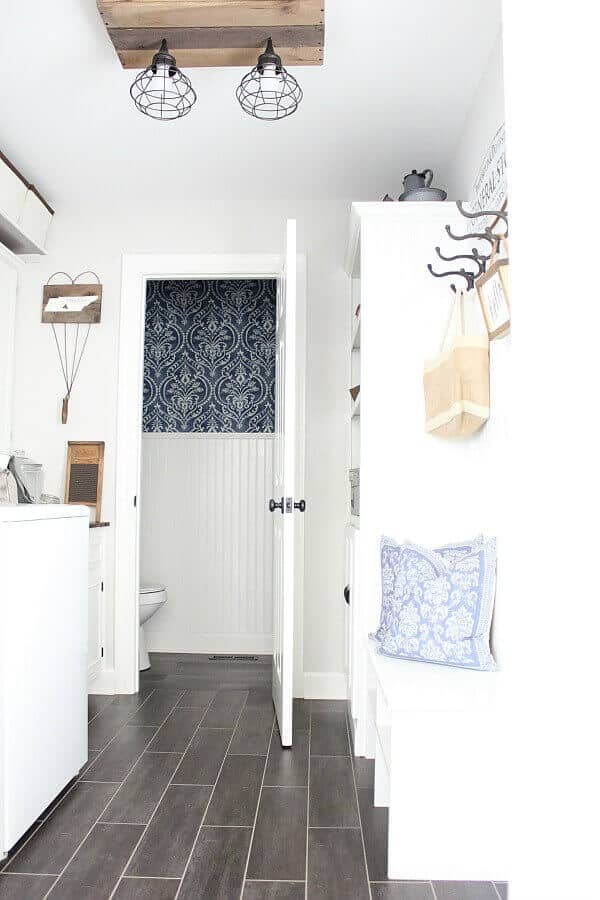
Head over to see the full reveal of this Powder Room in this post!
Our powder room is right off of our Laundry Room that we recently updated as well. You can see the details of that makeover in this post.
The benefits of using fabric as temporary wallpaper
The main selling point to using fabric as wallpaper is how simple it is to remove without any damage to the walls.
Even removable wallpaper may damage the walls which could go against rental agreements. Many new apartments have strict rules with what you can put on the walls.
Since this is hung in place with liquid starch, it’s still the best choice because once you remove the fabric, you simply wipe down the wall with a wet sponge and some warm water and you’re good to go!
Here are a few more benefits:
- Range of patterns: While there are plenty of options nowadays in the wallpaper world, there are so many pretty fabric designs that extend beyond what may be available in actual wallpaper.
- Easy to work with: moving and adjusting the fabric is very forgiving without damaging anything.
- Affordability: If you get the right kind of deal, you can find fabric at a deep discount, making this project extremely budget-friendly!
- Temporary Solution: Regular wallpaper is so permanent, but this is the best way to give an update to any room.
This diy tutorial for temporary fabric wallpaper is the perfect solution I found to get the gorgeous wall coverings I wanted.
So if you too have been asking how do you temporarily put fabric on a wall – then I hope this answered all your questions!
And I hope this temporary wallpaper tutorial inspired you to update your space!
It’s a great way to add softness, color or pattern to your home. And the best part is that you can swap it out as often as you like!
Problem Solving
If you run into any issues while installing your diy fabric wallpaper, check out these tips to help you!
Definitely learn from my first time experience!
Bubbling: After the fabric and starch dried, I noticed a few areas didn’t quite adhere where air bubbles formed.
I simply rewet those areas by rolling more starch onto the wall, then smoothed them out with my metal tool.
It took the bubbles away!
Corners: As I mentioned earlier, even though I pinned the corners of the fabric where the two walls met, it still pulled away in some places.
Pay extra attention to the corners and make sure the wall and fabric are both very wet while hanging. Then use a putty knife to run down the corner to make sure it’s really in there.
This is something you need to do before it dries to really ensure that there is a crisp line in the corners. Luckily this happened over my sink, so it not really a touchable area and my pattern hides it.
Pattern: If you have a patterned fabric, step back often to make sure you are still lined up.
Frequently Asked Questions
What kind of fabric can you use as wallpaper?
As a DIY-er, I would consider a variety of fabrics if I liked the pattern enough!
But there may be a few types of fabrics you may want to steer clear of.
Mainly those that may not be workable with the liquid starch, such as anything with a vinyl coating, satins, or non-breathable fabrics.
Fabric seems pricey! Where can I find affordable fabric?
There are some great options at online discount fabric stores.
You can even get some custom designed fabrics at Spoonflower.
I’ve even found some clearance bolts at Hobby Lobby!
Why not just use removable peel and stick wallpaper?
While peel and stick paper is a popular choice, I have heard stories from friends that their walls were not damage free.
Something to consider if you want to try the peel and stick option or either test a sample in an inconspicuous area, like a closet.
I’m scared I’ll mess up! Any tips to tackle the fears?
Any time you tackle a DIY for the first time, there is always fears that creep into your mind.
I suggest starting off on a small space, like a closet or accent wall and see how it holds.
Larger rooms or a high-traffic area, like a hallway, may not be the best choice for the first time.
If you just can’t get over your fears, you could check this post out where I found an easy way to create an accent wall using wall decals.
More DIYs from other BATHROOM PROJECTS
- $1000 DIY Bathroom Makeover That Doesn’t Look Cheap
- How to Easily Regrout Your Bathtub Walls Without Removing Old Grout
- How to Easily Make a Bathroom Countertop Taller
- Vintage Washstand Turned Bathroom Vanity
Resources
Ways to Shop Our Home
If you’re looking for sources for items in our home, you can find them here!
From furniture, home decor items, and some of our favorite tools, small appliances and organizing bins, you can find anything you are looking for.
Since most of our projects here at Noting Grace are DIYs or thrift store finds, we’ve done our best in finding budget-friendly alternatives for you.
Happy Shopping!
More Ways to Shop

Amazon Storefront
Our regular one-stop-shop for all things home. Shop all our favorite items in our home.
Shop By Room
Love the look of one of our rooms? Shop this list to find the exact link you are looking for.
Shop our LTK
Here is where you’ll find our Instagram round ups, upcoming sales and gift guides.


Hey Abby!
That is an excellent question and, honestly, one I’m not quite sure of! If it were me, I would grab a scrap piece of fabric before purchasing your final choice and try this method on a wall. Let it sit for a week to see how it works. That should show you if it would adhere. For some reason, if it doesn’t adhere, I would go the route of removable peel and stick wallpaper.
Good luck and sorry I didn’t have the exact answer for you, but I’m so glad you reached out!
Jen
This looks amazing!!! im trying to cover cement walls do you think this will work without tacking it into the wall?
Hi Nikki! That’s a great question. My walls are normally smooth, but I have lived out west where textured walls are the norm. I think the fabric option would be a great one to try! You could even try a small swatch and see if it works before doing an entire wall. Removal is easy peasy!
This looks awesome! Are your walls normally smooth or are they textured?