• Skip to primary navigation
  • Skip to main content
  • Skip to primary sidebar
  • Home
  • About
  • Projects
  • Shop
    • Facebook
    • Instagram
    • Pinterest
    • RSS
    • Snapchat
    • Twitter
Noting Grace
menu icon
go to homepage
  • Home
  • About
  • Projects
  • Shop
    • Email
    • Facebook
    • Instagram
    • Pinterest
    • Twitter
    • YouTube
  • subscribe
    search icon
    Homepage link
    • Home
    • About
    • Projects
    • Shop
    • Email
    • Facebook
    • Instagram
    • Pinterest
    • Twitter
    • YouTube
  • ×

    Home » DIY Projects

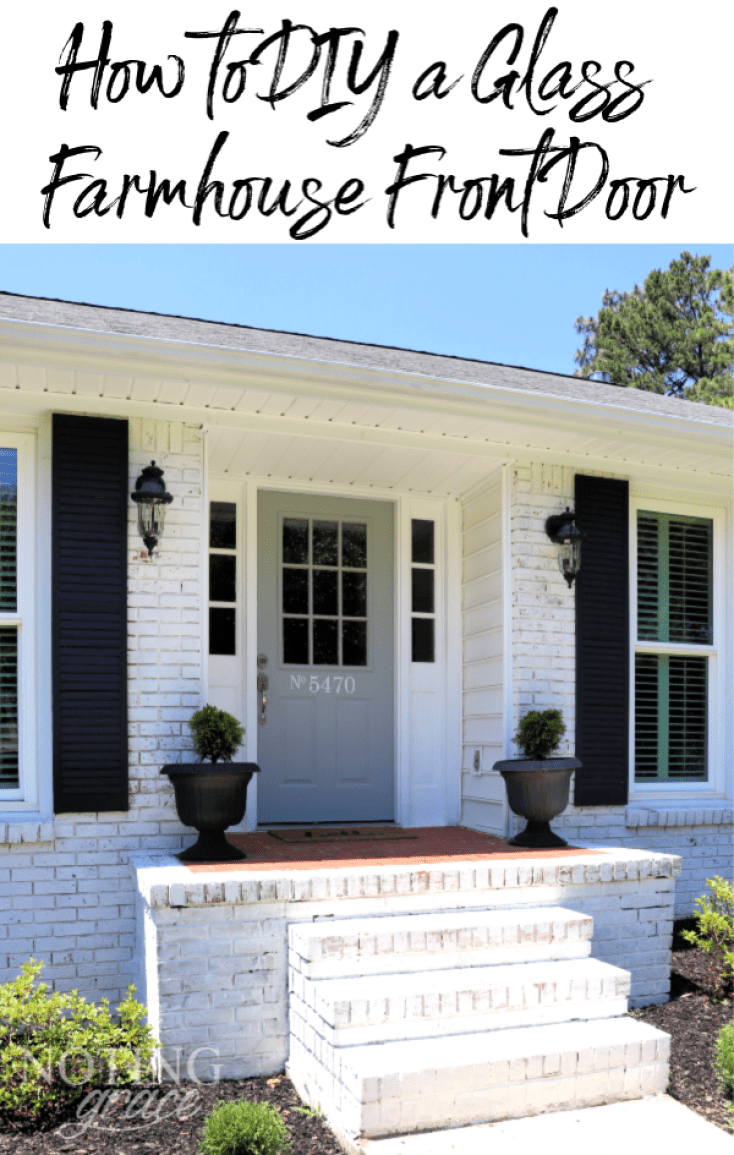
    Brightening our Entryway for Spring with a DIY Glass Door Insert

    by Jennifer Fancher 54 Comments Published: 3/15/18 Updated: 3/14/22 This post may contain affiliate links.

    865 shares
    • Share
    • Tweet

    Do you live with an ugly dated door? Here is how we brightened our Entryway with a DIY Glass Door Insert and how you can easily change the look of your home in just a few hours!

    Do you live with an ugly dated door? Here is how we brightened our Entryway with a DIY Glass Door Insert. It's scary to think you can cut a hole in your front door, but look at this amazing transformation!

    Spring is in the air, and what better way to usher in the change of season with some ways to transform your home.

    Today, 10 bloggers have come together to share their Spring DIYs with you. You can 'hop' from one blog to the next, getting oodles of inspiration for your home.

    If you have stopped by from Bree's blog, The Homemaking Momma, then welcome, welcome, welcome! Isn't her DIY table simply amazing!

    Now I will be on the hunt for a vintage shutter to make into a tabletop!

    We are so happy you are following along with us and I am so happy to share how we took our dull, dark and dated entryway and made it into a bright and swoonworthy space with one simple trick.

    Do you live with an ugly dated door? It's scary to think you can cut a hole in your front door, but look at this amazing transformation!

    Lemme tell ya, this is - by far - THE scariest DIY we have ever tackled. But I'm so happy with the results and wished I would have done this sooner.

    This DIY is one that you can do in a day and completely change the look of your home.

    Table of Contents

      • But it means cutting a hole in your front door.
    • DIY Glass Door Insert Materials
    • DIY Glass Door Insert Reveal
    • UPDATE!!
    • Spring I DIYed That
      •  
    • Pin this for later!
      • You may also like these posts:

    But it means cutting a hole in your front door.

    Say what?

    You heard me right.

    Instead of spending thousands of dollars on a new door and a few hundred more having it installed, you can do this yourself for a fraction of the cost.  

    So let's start with where we began and what materials you'll need for this DIY. I'll provide affiliate links in order to save you some time - at no cost to you! You can read my full disclosure here.

    Do you live with an ugly dated door? It's scary to think you can cut a hole in your front door, but look at this amazing transformation!

    Since our budget was tight when we first moved into our Almost Farmhouse four years ago, the only change I made to our entryway was painting the front door. But I just hated how dark our entry was.

    Every time I needed to photograph this room, I had to open the door in order to make the room bright enough for pictures.

    Until serendipity stepped in.

    I don't know how it happened, but I somehow stumbled upon a tutorial video of someone installing glass in an existing solid door.

    I immediately showed Trent and asked (begged...pleaded) if this was doable. And of course after seeing his excitement, I reached out to the glass company referenced in the video. The wonderful people at Zabitat helped to ensure their glass panel inserts would work for our door.

    Happy dances happened once we found out this was a real possibility! The glass was ordered and delivered within a week.

    Then when it arrived, and we saw the beauty of the glass and couldn't wait to get started. I knew we could do it and I also knew I especially have to show you how easy this DIY is!

    DIY Glass Door Insert Materials

    (Some affiliate links are provided below. Full disclosure here.)

    Your existing door
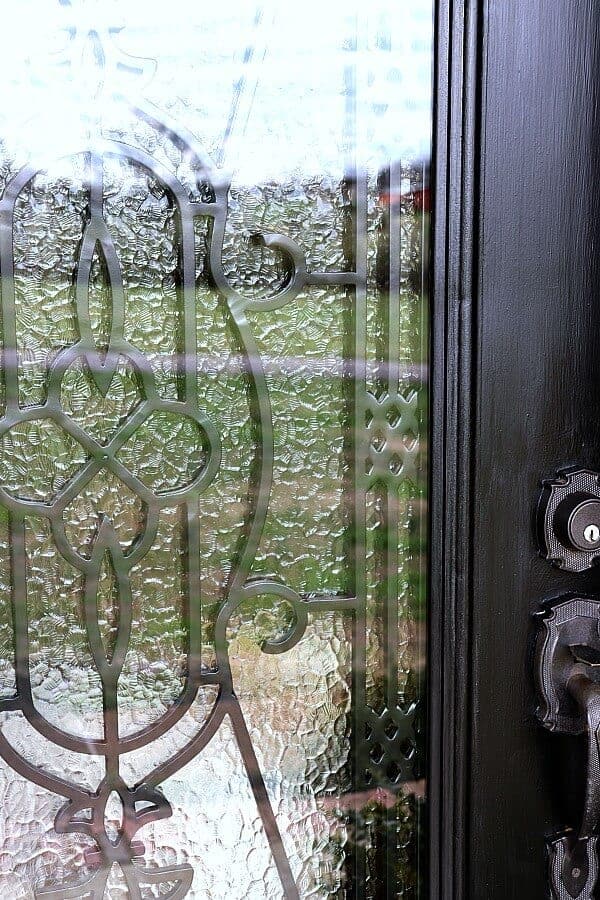
    Glass Insert from Zabitat (we ordered the Jacinto Glass insert from their Decorative line)
    Saw horses
    Masking Tape
    Tape Measure
    Pencil
    Drill (use a metal bit if your door is metal)
    Jigsaw
    Screwdriver
    Ear and Eye Protection

    Do you live with an ugly dated door? Here is how we brightened our Entryway with a DIY Glass Door Insert. It's scary to think you can cut a hole in your front door, but look at this amazing transformation!

    Before you start - know that this is a 2 person job. If you're the incredible hulk and can hoist heavy metal and glass doors on your own, then maybe you could do this alone, but if not - grab a buddy to help you.

    We began by removing the door and setting it on sawhorses. Even though you won't be cutting through the entire door, check to ensure your sawhorses won't interfere with any cuts - just in case.

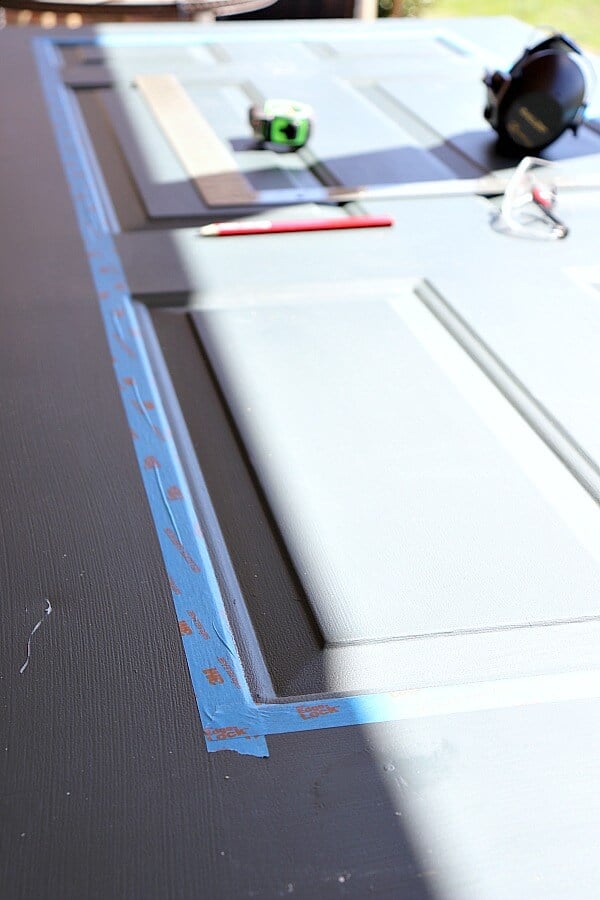
    Measure your area and mark with a pencil. For our glass, we had to measure 23" X 65", but this measurement varies for the size of door and glass you use.

    Tape off the area where you will cut - basically this prevents fraying and also helps to see the line to cut.

    Flip the door over and repeat the taping process because you will be cutting both sides of the door.

    Do you live with an ugly dated door? It's scary to think you can cut a hole in your front door, but look at this amazing transformation!

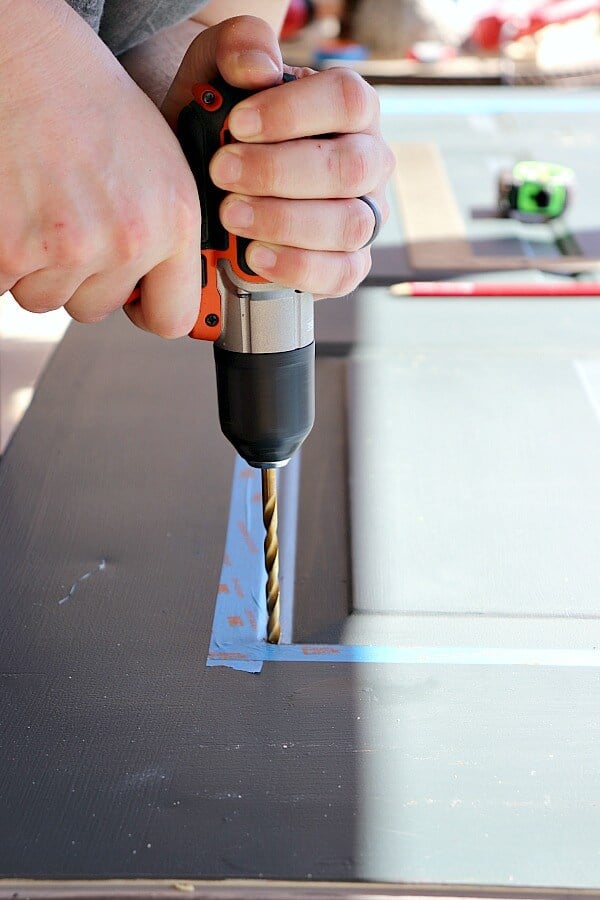
    Next, drill a pilot hole for your jigsaw. These tools aren't made for plunge cuts, so you're creating a starter hole for your jigsaw blade.

    Do you live with an ugly dated door? It's scary to think you can cut a hole in your front door, but look at this amazing transformation!

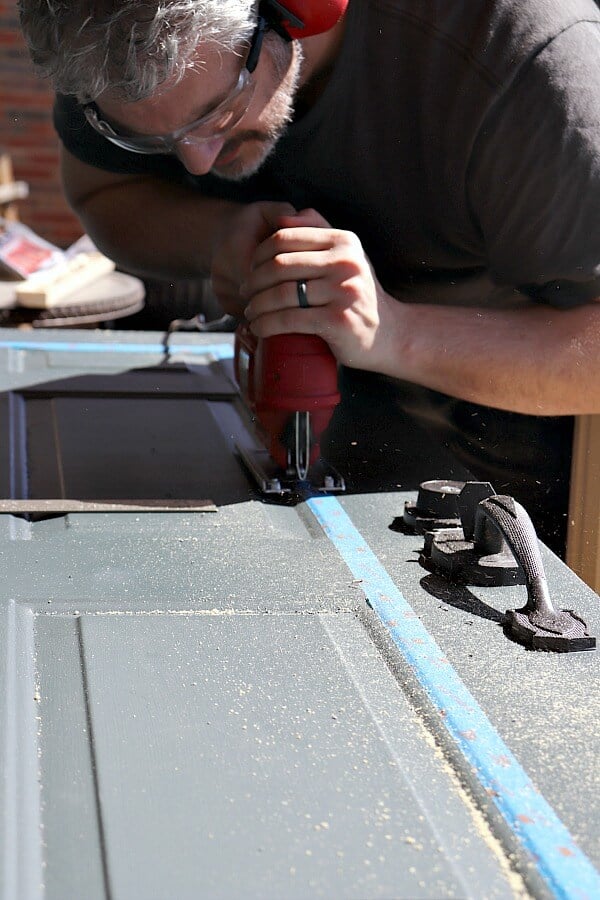
    Set your jigsaw blade to a 1 inch depth. Our jigsaw is a basic model that doesn't allow for those adjustments. So we purchased a shorter metal blade that would do the trick.

    Flip it over and repeat the cuts on the other side.

    Note: Don't be like Jen. Jen didn't read the part of the instructions where you are to remove the door hardware. Luckily, our jigsaw didn't interfere with the handle.

    But when we flipped it over to cut the other side, we noticed that the vibration from the jigsaw loosened the screws.

    Follow the instructions on this!

    Do you live with an ugly dated door? It's scary to think you can cut a hole in your front door, but look at this amazing transformation!

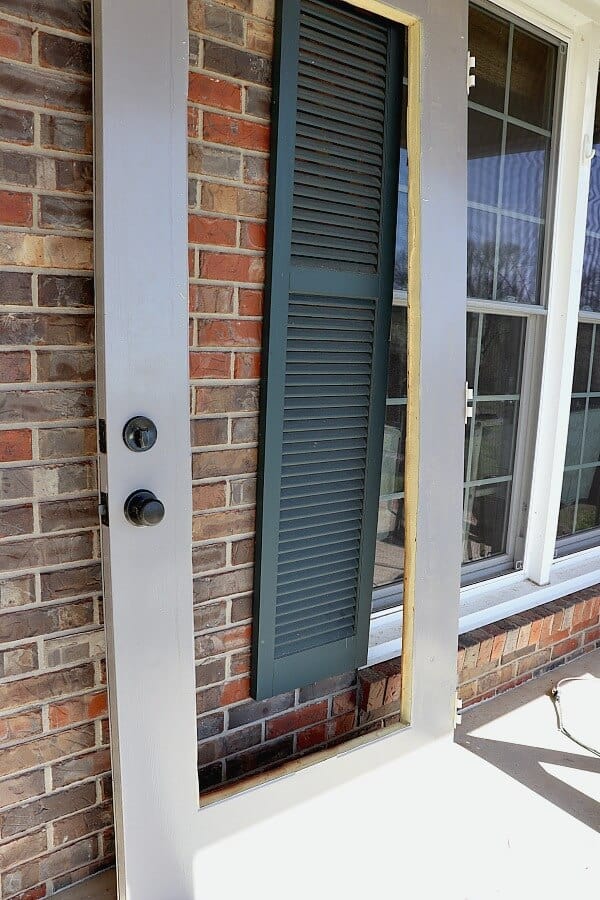
    After you cut both sides of the door, remove the middle and set the door to the side.

    At this point, Trent and I couldn't stop saying, "we just cut a hole in our door!" over and over again. It seemed impossible at first, but friends - it was SO easy!

    Do you live with an ugly dated door? Here is how we brightened our Entryway with a DIY Glass Door Insert. It's scary to think you can cut a hole in your front door, but look at this amazing transformation!

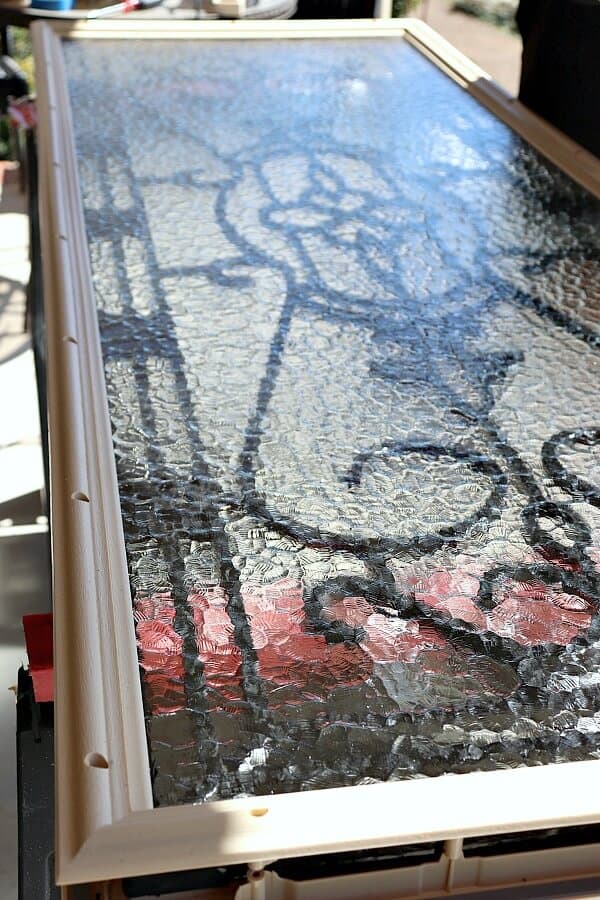
    Next, carefully place your glass insert on the sawhorses with the screw side frame facing up and unscrew and remove the top frame.

    Do you live with an ugly dated door? Here is how we brightened our Entryway with a DIY Glass Door Insert. It's scary to think you can cut a hole in your front door, but look at this amazing transformation!

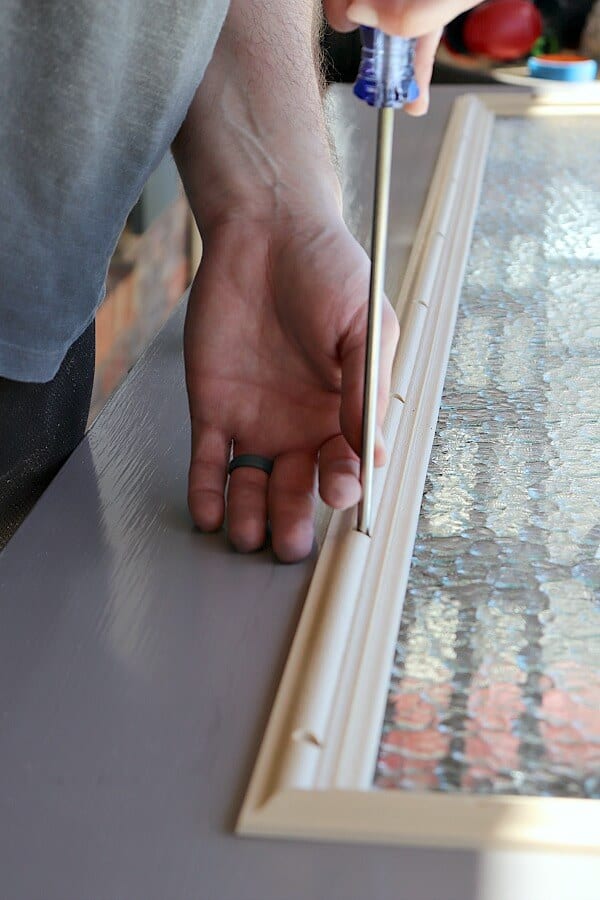
    Place the door over the glass and reassemble the frame. Also, make sure the screw side is on the interior of the door.

    Easy peasy lemon squeezy!

    Do you live with an ugly dated door? Here is how we brightened our Entryway with a DIY Glass Door Insert. It's scary to think you can cut a hole in your front door, but look at this amazing transformation!

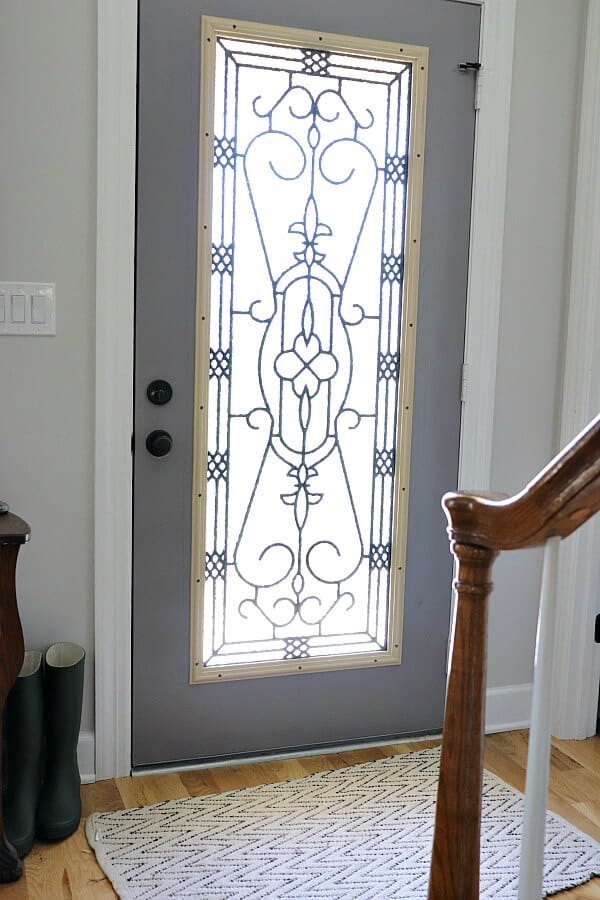
    Then you hang it back in place. CRAZY, right?! It already looks a million times better! Now all that needed to be done was painting it.

    DIY Glass Door Insert Reveal

    Do you live with an ugly dated door? Here is how we brightened our Entryway with a DIY Glass Door Insert. It's scary to think you can cut a hole in your front door, but look at this amazing transformation!

    We are planning on tackling our exterior of our home this year, and our shutters will be black, so I opted for a nice satin finish. It certainly complements the iron scrollwork beautifully!

    Do you live with an ugly dated door? Here is how we brightened our Entryway with a DIY Glass Door Insert. It's scary to think you can cut a hole in your front door, but look at this amazing transformation!

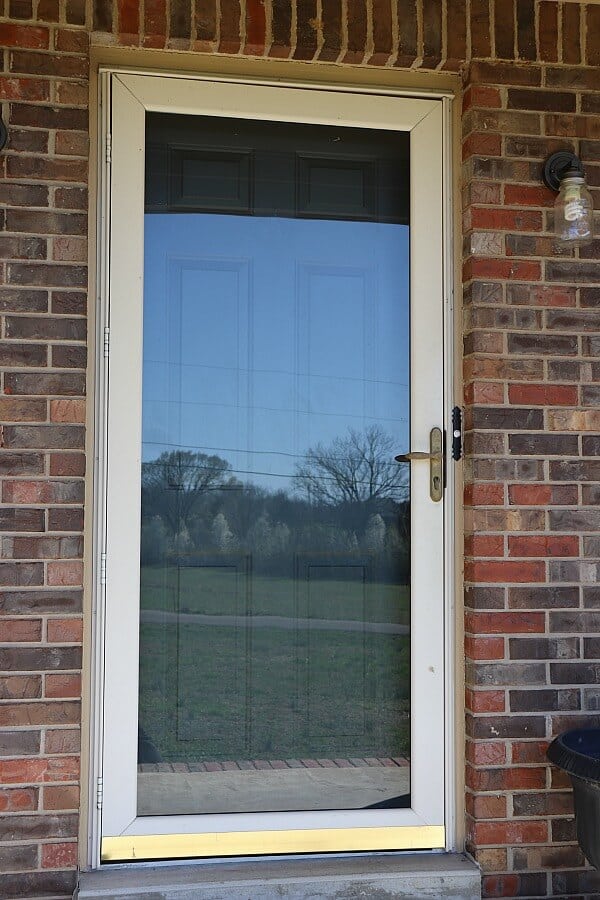
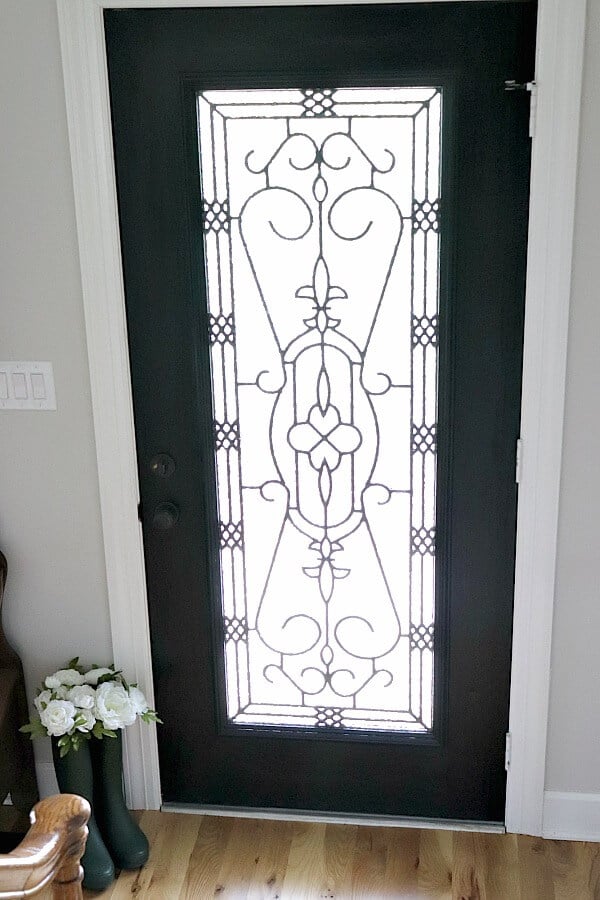
    Since our door faces south, and we get heavy winds, we opted to keep our storm door in place for additional insulation, so that got a fresh coat of black too.

    Do you live with an ugly dated door? Here is how we brightened our Entryway with a DIY Glass Door Insert. It's scary to think you can cut a hole in your front door, but look at this amazing transformation!

    What a difference! And of course this is going to pop when we paint our brick!

    Do you live with an ugly dated door? Here is how we brightened our Entryway with a DIY Glass Door Insert. It's scary to think you can cut a hole in your front door, but look at this amazing transformation!
    Do you live with an ugly dated door? It's scary to think you can cut a hole in your front door, but look at this amazing transformation!

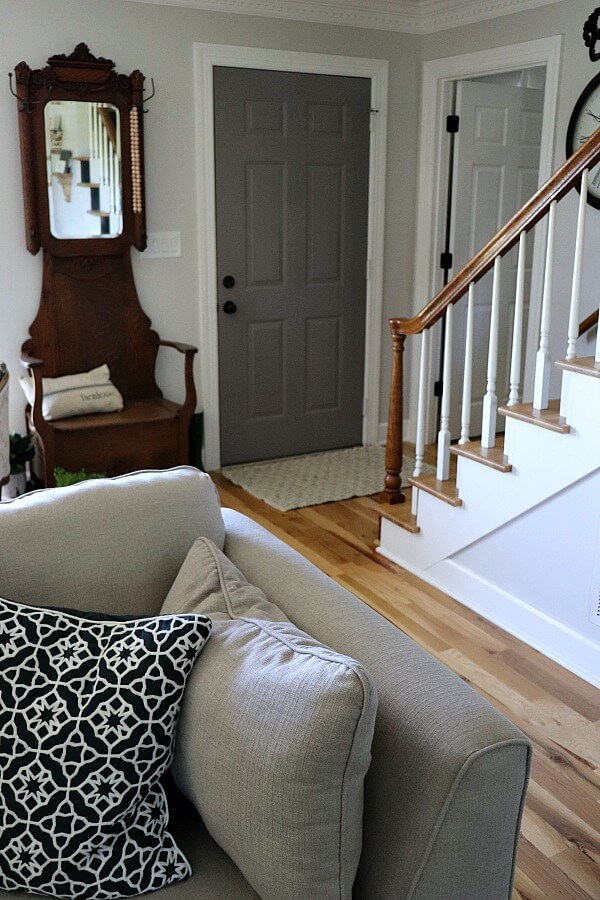
    And when you open my beautiful door, you are equally greeted with my fun new staircase makeover!
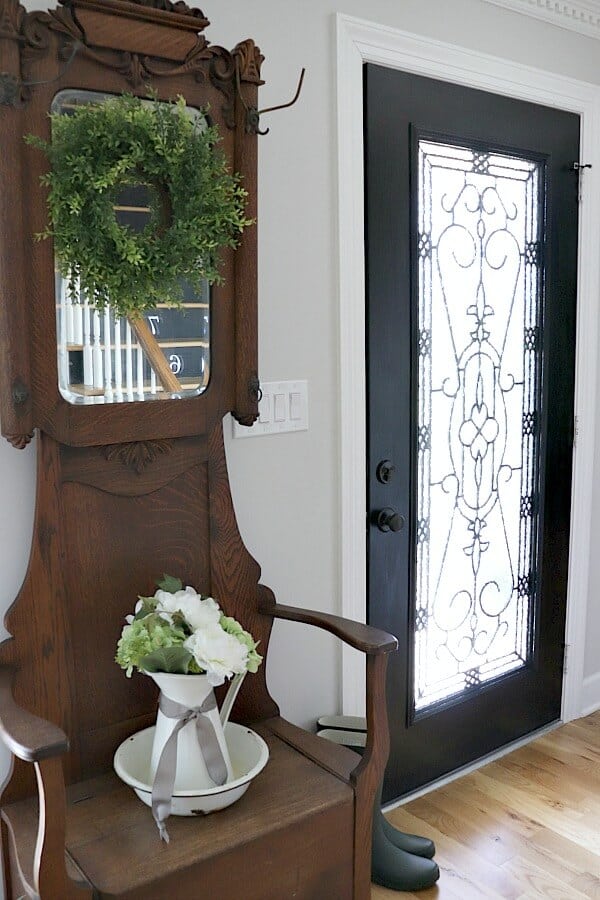
    Do you live with an ugly dated door? It's scary to think you can cut a hole in your front door, but look at this amazing transformation!
    Do you live with an ugly dated door? It's scary to think you can cut a hole in your front door, but look at this amazing transformation!

    Finally - no more dark and dreary entryway! This DIY Glass Door Insert has not only changed the look of my house from the exterior, but brightened up my entryway as well. And nothing says Spring to me more than the sunshine streaming in!

    So if you hate your front door, or are hesitant to take on this project, I'm here to tell you that you can do it! Don't be afraid to find economical ways to create a home you love - even if it means doing something scary. It will be so worth it!

    So are you ready for more Spring inspiration? Next up on this tour of homes is Kelly from The Tattered Pew and her gorgeous dresser makeover. You will love the color of her dresser - so 'hop' on over to say hi!

    And if you're new to Noting Grace, I'd love to know that you visited. Leave me a comment below and ask me any questions you may have.

    I also wanted to extend a special thank you to Zabitat for teaming up with us on this post and for all their help in selecting the right glass for our door. We just love it!

    UPDATE!!

    We've moved and installed another glass insert at our new home! Check it out!

    how to DIY a glass farmhouse front door

    Be sure to visit the other bloggers on this tour by visiting their links below

    Spring I DIYed That

    Spring I DIYed That

    A Cuter Tutor  |  The Homemaking Momma  |  Noting Grace
    The Tattered Pew  |  Joy in Our Home

    Spring I DIYed That

    Little by Little Farmhouse  |  My 100 Year Old Home  |  Repurpose and Upcycle
    Pennies From Heaven Home  |  Uniquely Taylor Made


    Pin this for later!

    Do you live with an ugly dated door? Here is how we brightened our Entryway with a DIY Glass Door Insert. It's scary to think you can cut a hole in your front door, but look at this amazing transformation from Noting Grace!

    You may also like these posts:


    « Update Your Entryway with this Easy Staircase Makeover
    Artificial Ferns for your Front Porch »

    Join the List

    for your weekly Noting Grace fix.

    Reader Interactions

    Comments

      Leave a Reply

      Your email address will not be published. Required fields are marked *

      This site uses Akismet to reduce spam. Learn how your comment data is processed.

    1. Jennifer Fancher

      February 25, 2021 at 7:54 am

      Hi Ivory - thanks so much for your kind words! That truly made my day! For this glass insert, it was on the pricier side - it's been a few years, but I believe it was around $700 at that time. The inserts with the metal run a bit higher than the simple glass ones. but it's still a huge difference!

    2. Ivory

      February 24, 2021 at 7:07 pm

      I just found your site. Bi love, love, love how your door turned out so fabulous. Wow, your door went from the look of a $120.00 to a $15,000 door. I am scolded! One question, how much did it cost for this gorgeous transformation?

    3. Jennifer Fancher

      May 23, 2020 at 10:13 am

      Hi Diane! That is a great question! We definitely needed a door with glass to brighten this dark area and I wanted a full glass front door. A $700 insert was about the same cost as the decorative glass door I could find, but I hated the decorative glass patterns offered in the price range. Hope that helps!

    4. Diane

      May 20, 2020 at 8:58 am

      It looks amazing! May I ask why you didn’t just replace the whole door? It seems like a new door would’ve been a cheaper and easier route.

    5. Jennifer

      July 24, 2019 at 5:24 pm

      Thank you so much - and we love how much this brightens our entryway!

    6. im

      July 22, 2019 at 9:40 am

      Love this idea! Number one issue with these inserts on the manufacture's webpage - installers who leave the trim the original color instead of matching to the door color, even if the surrounding trim is white. Sadly makes it look cheap 🙁 Yours looks fantastic!

    7. Jennifer

      June 25, 2019 at 12:14 pm

      This piece came from Zabitat. It's called the Jacinto insert and we love how it looks! Here's a direct link

      https://www.zabitat.com/u/odl-jacinto-door-glass---24-x-66-frame-kit-686ja

    8. Jennifer

      June 25, 2019 at 12:12 pm

      Thank you so much for saying such kind words! This is why I share all our projects!

    9. Tina Simon

      June 25, 2019 at 11:51 am

      Where did you get the wrought iron piece for your door? I love your beautiful door.

    10. Anonymous

      June 25, 2019 at 7:31 am

      Found your blog ... inspiring & interesting
      I have saved a quote from you
      " Don’t be afraid to find economical ways to create a home you love
      – even if it means doing something scary. It will be so worth it! "

    11. Anonymous

      April 17, 2019 at 12:31 pm

      Just beautiful! Looks like a different door altogether. Simply genius!

    12. Jennifer

      February 10, 2019 at 8:47 am

      Thank you so much Kim! It was scary, but so worth it!

    13. Kim

      February 09, 2019 at 5:24 pm

      Wow!!
      I absolutely LOVE, LOVE, LOVE this idea!
      Give yourself and hubby a pat on the back, you did a wonderful job 🙂

    14. Jennifer

      June 20, 2018 at 9:28 am

      I found it from a company called Zabitat. They are so helpful to match the right glass to your door's measurements. It's scary at first, but so worth the result!

    15. Stephanie

      June 20, 2018 at 9:09 am

      What a gorgeous transformation! I have wanted to switch out our front door since we moved in two years ago. I didn't even know you could get glass inserts! Where do you find the glass? I really want to do this project now! Thanks for a great post and DIY!

    16. Jennifer

      April 16, 2018 at 7:02 pm

      Erlene - you are so kind! Thank you so much!

    17. Erlene

      April 15, 2018 at 2:33 pm

      Wow, that is an amazing transformation and it looks pretty easy too. The new insert and black color makes it look so rich.

    18. Jennifer

      April 12, 2018 at 8:03 am

      Thanks Liz! We were amazed when we found this product as well! It was such a fun way to transform a door we hated. Thanks for taking time to comment!

    19. Liz @ Home and Gardening With Liz

      April 12, 2018 at 7:33 am

      Wow what an amazing transformation! I didn’t know a door could be converted like this. Doors can be so expensive- what a great way to get a new look!

    20. Jennifer

      April 12, 2018 at 7:04 am

      Thanks Debra! We are so pleased with the results!

    21. Debrashoppeno5

      April 11, 2018 at 7:13 pm

      The new door makes such a great difference. I got a new door with the glass and love it. My door needed to be 't replaced so I couldn't do what you did. Great project.

    22. Jennifer

      April 11, 2018 at 3:16 pm

      Thanks Teresa! It was definitely scary making that first cut, but I'm so glad we did! Now we're looking at other doors in our home and thinking, hmmmm.... maybe!

    23. Teresa

      April 10, 2018 at 3:15 am

      I love your "new" door. I'm pretty sure this is something I would not be brave enough to tackle myself, but you did a wonderful job.
      Thank you for sharing at The Really Crafty Link Party. Pinned.

    24. Jennifer

      March 21, 2018 at 5:00 pm

      Thank you so much, my dear friend! It helped having you ladies cheer my on from behind the scenes! I'm so glad you joined us on this DIY hop and I look forward to the next time!

    25. Tara

      March 21, 2018 at 8:52 am

      Jen! I've said it before and I'll say it again...I'm so amazed at your bravery with this! It turned out beautifully, and I'm so happy you have more light coming in, since I know you've been wanting that for so long!

    26. Jennifer

      March 17, 2018 at 9:37 am

      Thanks Julie! I can't stop staring at this door! It going to be extra amazing when we paint our house!

    27. Julie Briones

      March 16, 2018 at 5:39 pm

      AMAZING, Jen! You and your hubby did a wonderful job!

    28. Jennifer

      March 16, 2018 at 6:57 am

      Thank you Leigh! We are so happy with the results and it will look amazing with my painted house!

    29. Jennifer

      March 16, 2018 at 6:56 am

      Thanks Kelly! I'm so honored to be on this blog hop with you!

    30. Jennifer

      March 16, 2018 at 6:56 am

      Thank you for joining in! It certainly is loaded with inspiration!

    31. Jennifer

      March 16, 2018 at 6:55 am

      Yes you can! I have seen other projects where they replaced the glass. That would be even easier since you don't have to cut a hole - it's already there!

    32. Angel

      March 15, 2018 at 11:42 pm

      Wow! What a great idea. I wonder if we could replace the window insert we already have that I absolutely hate.

    33. Kendra | www.joyinourhome.com

      March 15, 2018 at 10:21 pm

      Jen, that is so amazing!!! I’d be right there with you, freaking out at cutting my door! But it looks stunning and a perfect tutorial! Thx so much for hosting this fun blog hop, friend! Xo

    34. Kelly

      March 15, 2018 at 6:59 pm

      Jen your door turned out beautiful!!! I love how much light it lets in! Thank you for this fabulous idea!

    35. Leigh at Little by Little Farmhouse

      March 15, 2018 at 3:11 pm

      Jen,
      This is amazing! You are so brave and it really paid off. I love that you painted the storm door too!

    36. Jennifer

      March 15, 2018 at 1:44 pm

      Thank you so much! I appreciate you taking the time to comment!

    37. Jennifer

      March 15, 2018 at 1:43 pm

      Thank you Lindsey! It was so much fun to make my front door into a piece I love!

    38. Anonymous

      March 15, 2018 at 11:33 am

      I added a door with beveled glass panels on my front door and it adds so much light in my house.
      I had no idea that glass could be added to an existing
      Door it came out beautiful.

    39. Lindsey

      March 15, 2018 at 10:16 am

      Jen, this is amazing! I love how you can totally transform a door without having to buy new. Thanks for sharing this friend.

    40. Jennifer

      March 15, 2018 at 9:31 am

      Thank you and Me too!!!

    41. Jennifer

      March 15, 2018 at 9:31 am

      Thank you Stacey! The light has changed not only changed the look of my home, but I can't get over how much brighter my space is! I absolutely love this DIY! I appreciate you commenting and leaving such sweet words - it always means so much!

    42. Jennifer

      March 15, 2018 at 9:30 am

      We've had it in for a week now, and I notice that I am stopping and staring at this gorgeous piece! I just love how it turned out!

    43. Jennifer

      March 15, 2018 at 9:29 am

      Thank you Bree - that first cut was soooo scary, but well worth the result!

    44. Anonymous

      March 15, 2018 at 7:19 am

      Nice! Looks great Jen! Can’t wait for rest of that exterior makeover!

    45. Stacey @ Poofing the Pillows

      March 15, 2018 at 6:36 am

      That looks amazing, Jen!! We have always had glass front doors and we like it so much. The light coming in is invaluable. Some people say, don't you worry about privacy? But the way I see it is if someone wants to see in that badly they are going to do it. That was an amazing DIY!

    46. Carole Strawn

      March 15, 2018 at 6:27 am

      Super beautiful and successful makeover We are adding onto our house and I included a door with a leaded glass insert. I love how it lets the light into the room. You are going to be so happy with this improvement. It looks fabulous..

    47. Bree

      March 15, 2018 at 6:25 am

      Wow, Jen!! This turned out so amazing! What an awesome way to transform your front door!

    Primary Sidebar

    Jen and Trent Fancher of Noting Grace

    Hi, We're Jen and Trent!

    We’re the DIYers behind the projects here at Noting Grace. We know that having the home of our dreams isn’t a reality for most of us, but you can create a home you love with a little bit of ingenuity.

    Our hope is to encourage, inspire and provide you with all the tools to help you create a home with intention that you love to live in.

    Want to know a little about us?

    More about us →

    Latest Posts

    • Do Painted Floor Tiles Last - Our 2 Year Review
    • Welcome Home Saturday with Cloches and Lavender
    • How to Easily Make DIY Soundproof Panels
    • Welcome Home Saturday with Cottage on Bunker Hill

    Trending Now

    • How we Changed our Bathroom Tile for $150 bucks
    • The Epic Gift Guide for Musicians and Music Lovers
    • 3 Secret Tricks to Removing Popcorn Ceilings
    • DIY Flooring: How We Changed our Kitchen in 3 days for Less than $400

    Footer

    ↑ back to top

    Meet Jen & Trent

    ABOUT
    PRIVACY POLICY
    DISCLOSURES

    Newsletter

    FREE PRINTABLES
    SUBSCRIBE to our Newsletter

    Contact

    CONTACT
    WORK WITH US /
    Brand Partnerships

    Noting Grace is a participant in the Amazon Services LLC Associates Program, an affiliate advertising program designed
    to provide a means for sites to earn advertising fees by advertising and linking to Amazon.com.

    COPYRIGHT © 2022 NOTING GRACE

    865 shares