DIY Flooring: How We Changed our Kitchen in 3 days for Less than $400
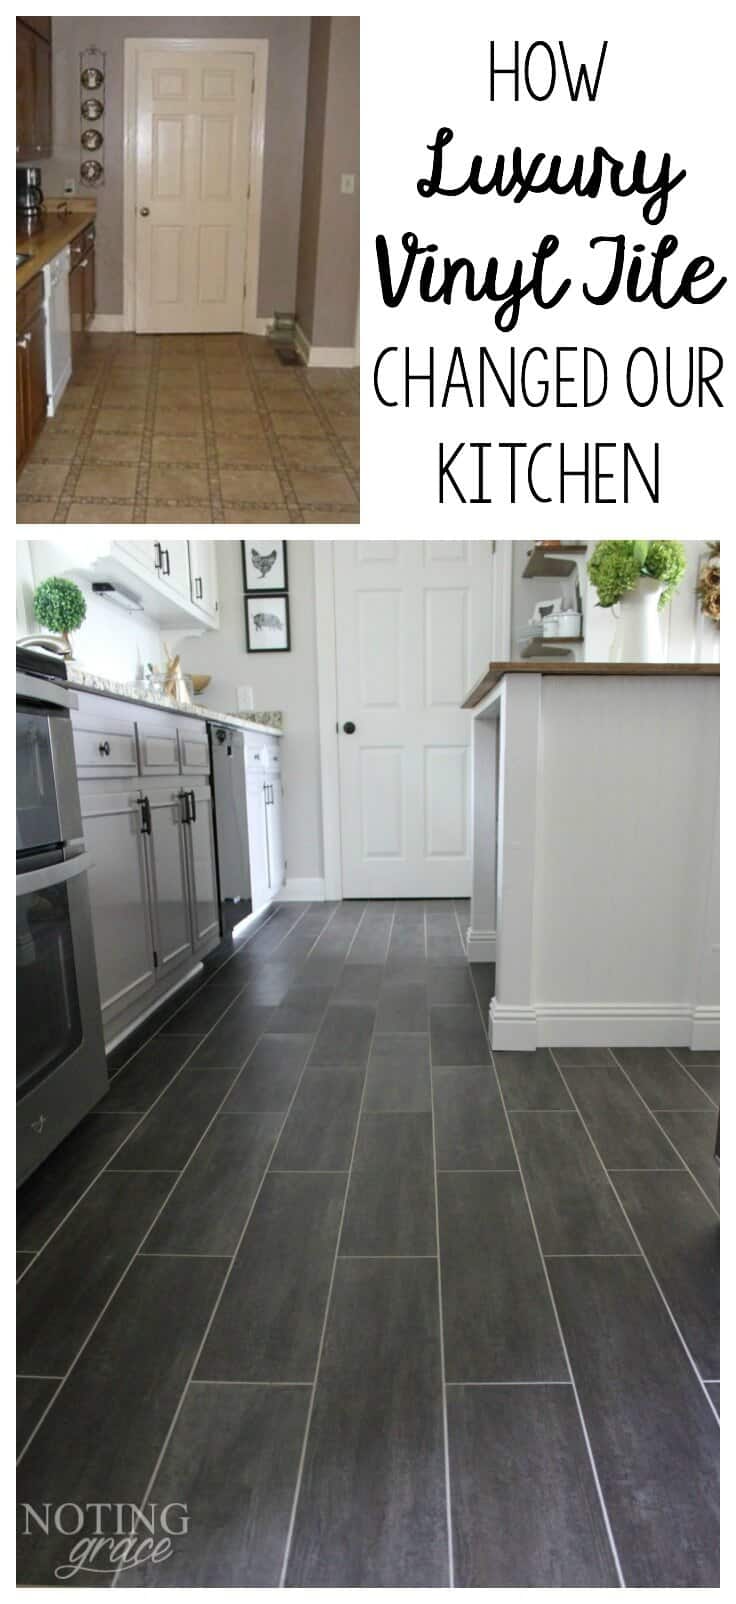
Do you have ugly floors that you can’t stand, but don’t know how to change them? Here’s how we transformed our kitchen with DIY flooring!
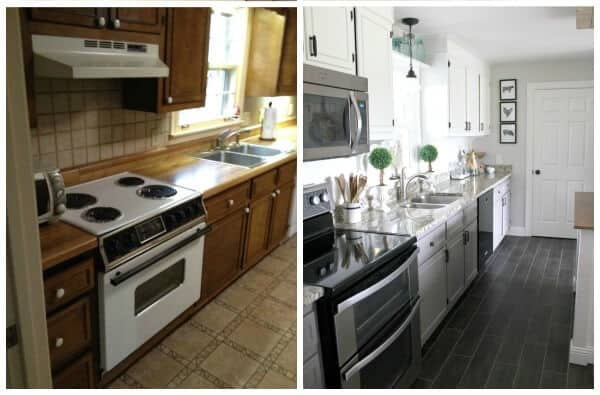
It always happens like this. I started one project just to have it trail off into another one – that’s what happened with this DIY Flooring.
Oh, but what a beautiful little trail it was!
I wasn’t fond of our linoleum floor in our kitchen.
Okay, I’m lying.
I vehemently abhorred it, silently cursing it each morning while stumbling in to pour my morning cup.

When company would come over, I was always apologizing for those awful floors. I found myself giving the disclaimer that I was well aware of how hideous they were and would share my brilliant plan to replace them with DIY flooring.

When we purchased our Almost Farmhouse over 2 years ago, the first thing I knew I’d be replacing was our floors.
We were able to get rid of that pink carpet that haunted me and replace it with hardwood floors. Our original plan was to have those beautiful hardwoods throughout our entire first floor, but the budget didn’t allow for it, so when cutting corners, we could only replace the carpet.
So this peachy, permanently stained, faux mosaic linoleum stayed. I thought of painting it, and made a valiant attempt on a sample scratch piece we found in the attic, but it didn’t look good with all the patterned faux mosaic tiling.
But did that stop me from making over the kitchen? No way!

Aw, Bless her heart!
It’s like getting all gussied up in a fancy ballgown and wearing dollar store flip flops.
When we took on the One Room Challenge hosted by Calling it Home, we were able to move our water heater that sat in the laundry room. Our laundry room and kitchen are beside each other complete with the same hideous flooring throughout.
Since I knew we had to tackle the floors for our mudroom makeover, we opted for speed, ease and cost. We chose Luxury Vinyl Tile made by Stainmaster. Lemme tell ya – I LOVE this new DIY flooring we installed!
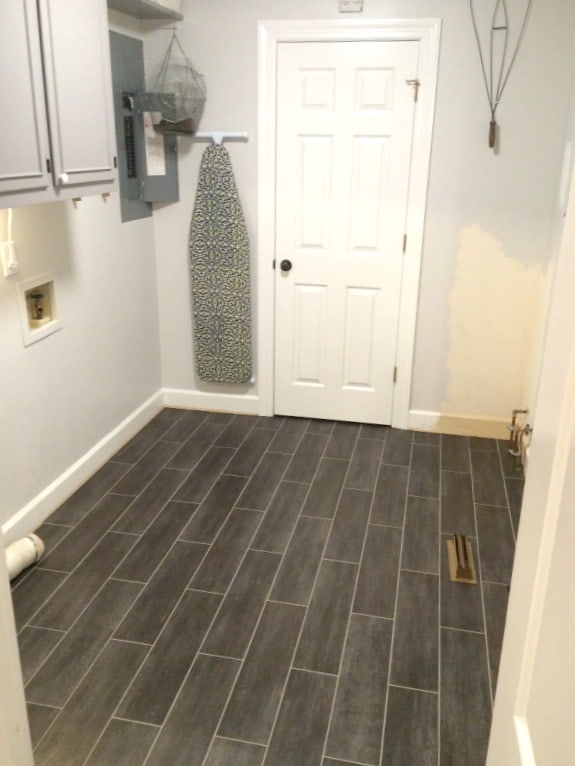
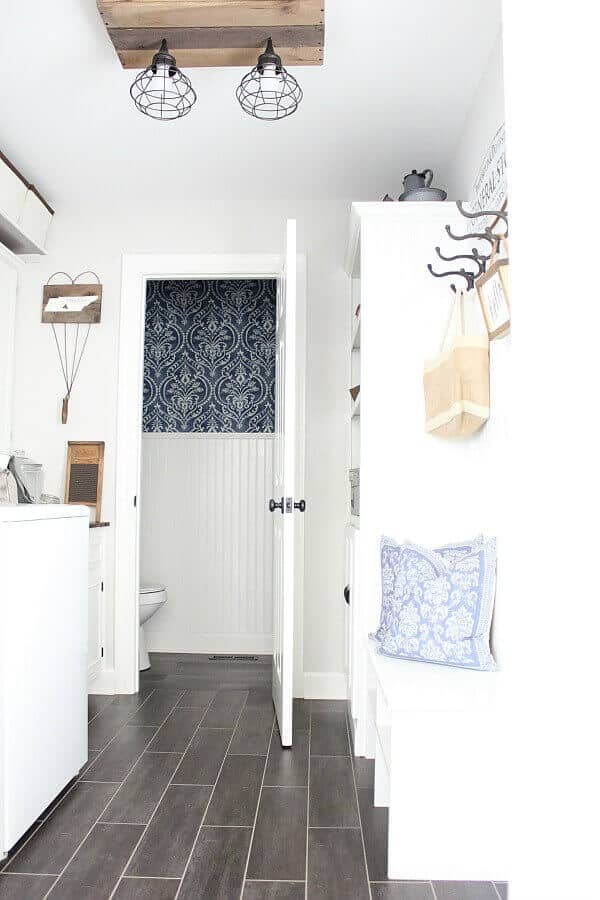
And that’s how the bunny trail began. The main goal was to replace the flooring in the laundry/mudroom only, and it took us just one evening to lay all the tiles, and a few hours the next day to grout them.
After seeing how quick and easy it was, we knew we found the White Knight that was going to rescue me from these awful linoleums forever! And I loved how gorgeous it looked, so we just kept on going into the kitchen – which is about 135 square foot of flooring. This post contains affiliate links for your convenience. Click here to read my disclosure.
How to lay DIY Flooring
Groutable Luxury Vinyl Tile
(Some affiliate links are provided below. Full disclosure here.)
Materials Needed
- TSP (Trisodium Phosphate) to scrub and prep the floors
- Door Jamb Saw
- Peel and Stick Luxury Vinyl Tile
- we got our Stainmaster Casa Italia Tiles from Lowe’s
- Premixed Grout – ours is Blue Hawk Premixed Grout in Saddle Gray
- Tile Spacers
- you can get varying sizes, we used 1/8 T spacers
- Rubber Grout Float to spread the grout
- Plastic scraper
- Paper towels
- Bucket of warm water
- Big Sponge
It is the simplest DIY with the biggest impact we’ve ever done. You should follow the instructions provided by the manufacturer for the flooring you choose, but here’s what we did and how easy it was.
Step one
Clean your floors. And I mean really clean them! We purchased TSP (Trisodium Phosphate) and scrubbed the floors 3 times. This preps the surface, removing grime and dirt and helps with better adhesion with the tiles.
Step two
Lay out a plan. Luckily, we found that the grid of the old linoleum acted as a perfect line for us. We continued with the line from the laundry/mudroom and worked our way out from there. If you don’t have a plan, you will have to mark your floors and possibly dry fit to see how it will look.
Step three
Peel, stick, space, repeat. Peel, stick, space, repeat.
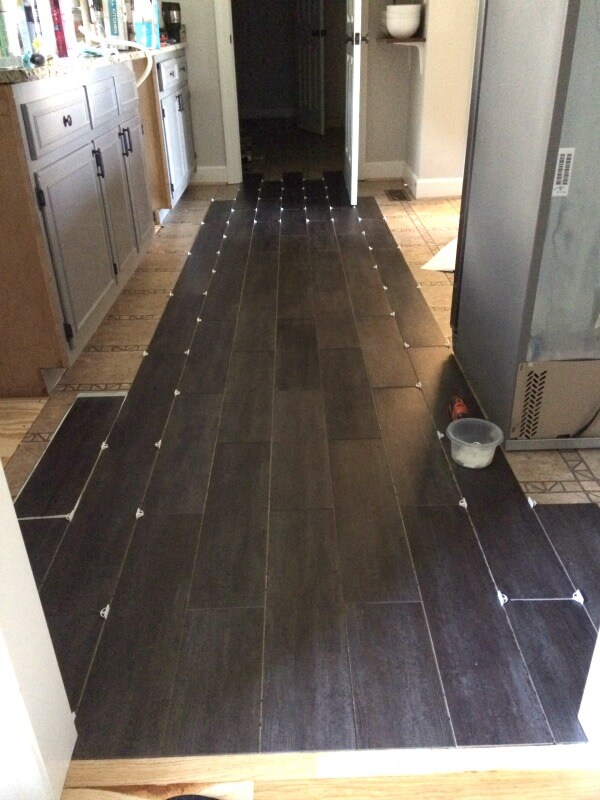
Easy peasy! We noticed that it took a while for the glue to adhere, so be careful when walking on them so they don’t move out of alignment of the spacers if you are grouting. I’ve seen where some people rent a weighted roller and roll over the floors. I’ve seen where people use a rolling pin. I just simply walked on top of them and let them sit overnight. They were snug and tight by the time we were grouting the next morning.
Tip: knee pads! I used my gardening pad to help me. Oh, and printed on the paper back of each tile is an arrow. Make sure you are laying your tiles so that all the arrows face the same way.
Step four
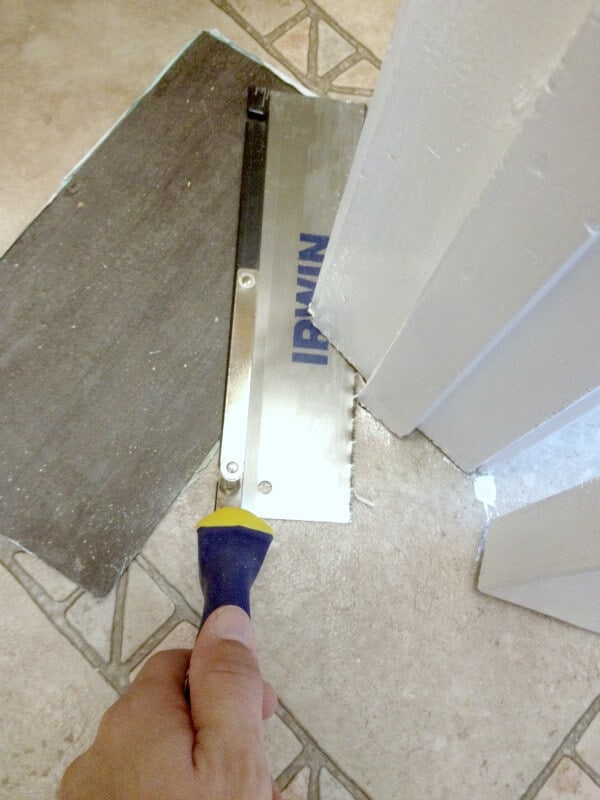
Trimming for weird corners. We used a box cutter to make intricate trims and even found it easier to cut the door frames to fit the pieces underneath.
Step five
Grouting time! In this case, we opted for a gray grout to disguise the grime that I knew my boys would definitely be tracking in. I tried to take pics of the grouting process, but it’s a bit messy and I really didn’t want hardened grout on my nice camera.
The product we used came in a tub the size of a vegetable shortening can. Unfortunately my trowel didn’t fit. For this reason, I used the small spatula like plastic scraper to apply an initial glob of premixed grout from the tiny tub. Using the rubber trowel, I was able to spread it really easily. By working in small areas, especially wiping with paper towels as you go, you should be able to avoid the hazing effect.
The kitchen took a lot longer to grout than the 3 hours of our tiny laundry room. I had to divide it into two days, but that may be because I was already exhausted from completing another room. Here’s a pic of the grout drying. It’s a bit lighter when wet.
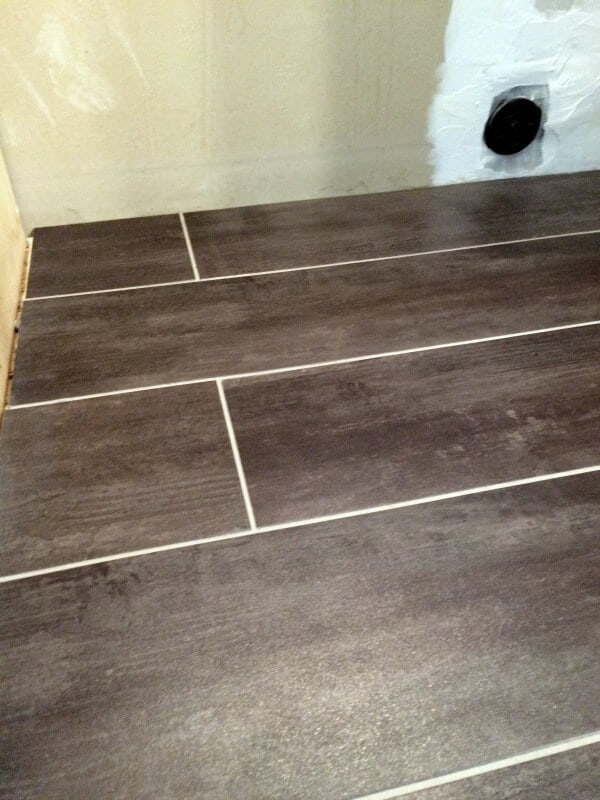
Finally, it’s dry after 24 hours.
A lot have asked about the transition between the hardwoods and the tile. So here is a close up of how they look next to each other.
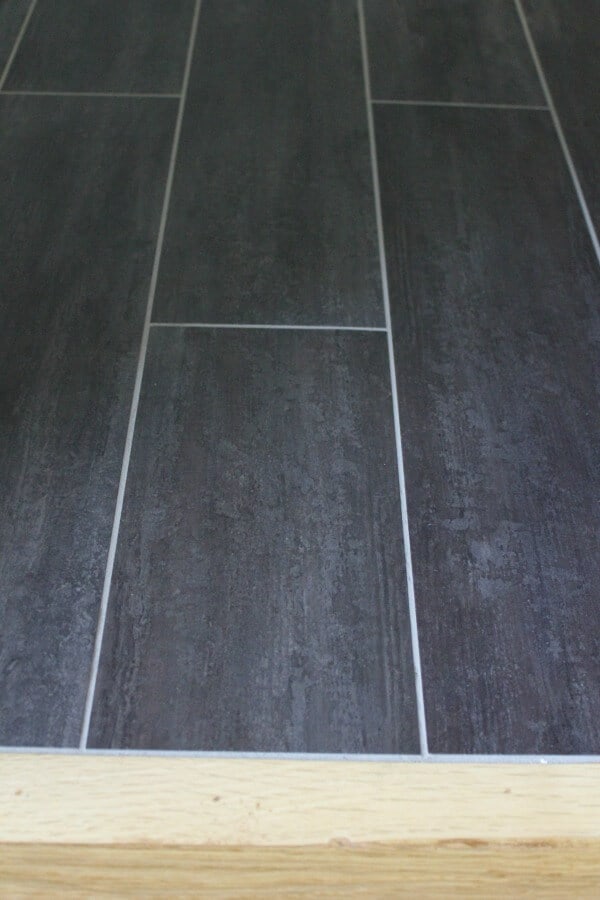
Because we were able to grout right up to the hardwood floors without any issues, now we didn’t need to add a threshold. SCORE!
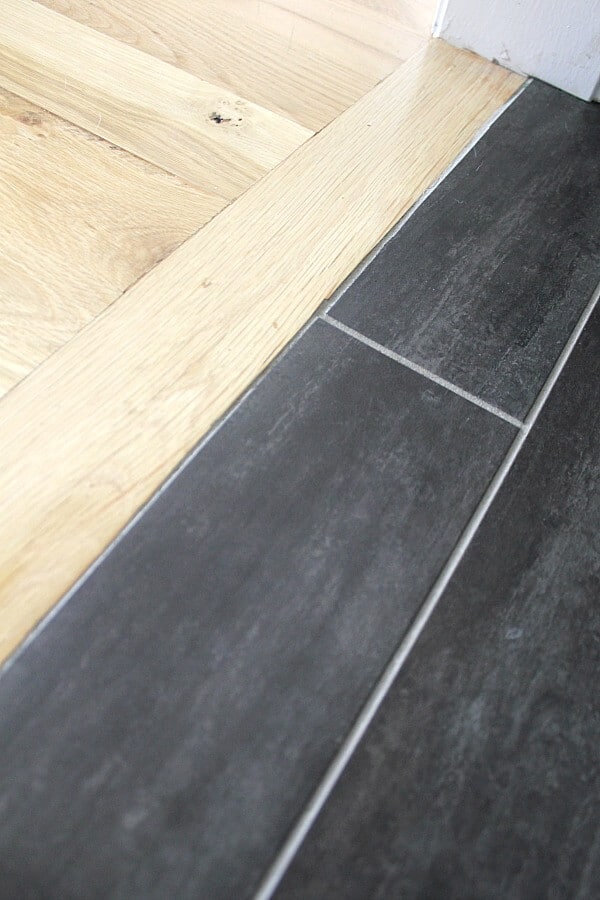
As you can see – the threshold is a seamless match for your flooring.
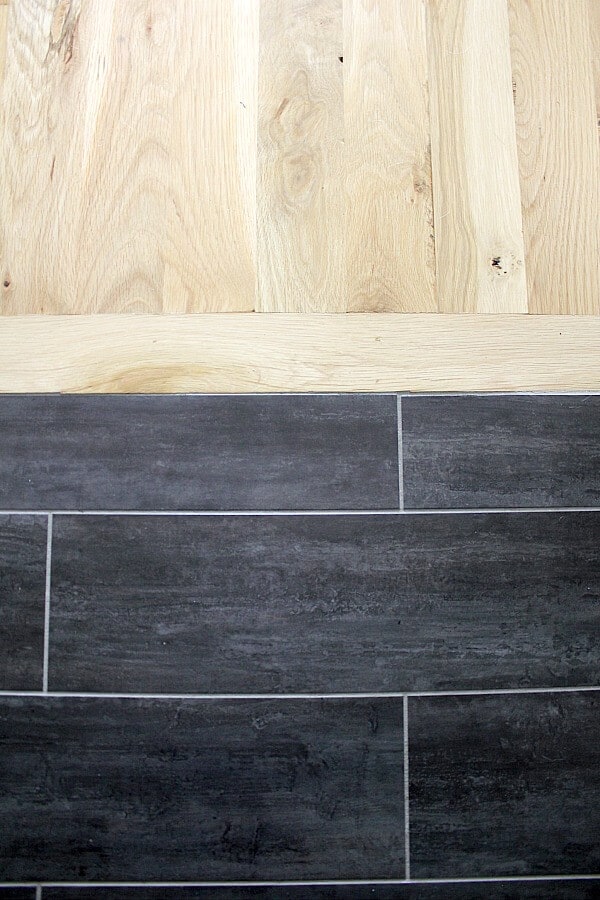
Step six
Wait. It’s best to not walk on the floors and allow the grout to cure for 24 hours. I was already frustrated having my washer and dryer in the living room for a few days, but now had our stove and dishwasher there! I was smart and pulled the fridge out, while still plugged in, and grouted and allowed it to cure overnight. The next day, I started on the opposite side of the room and worked my way back to the fridge and could push it back in place and then waited another 24 hours for the second half to dry.
Waiting is the hardest part, but look at the difference!
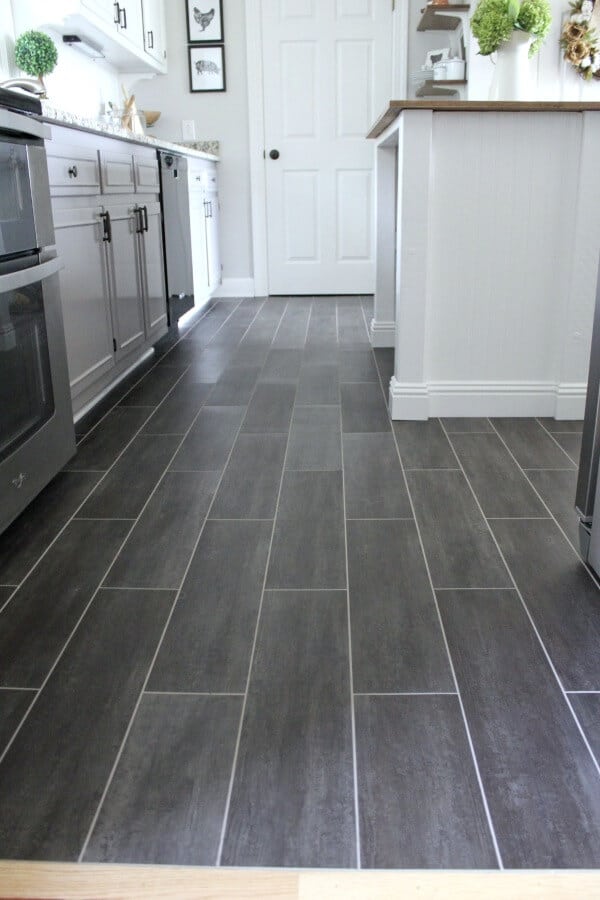
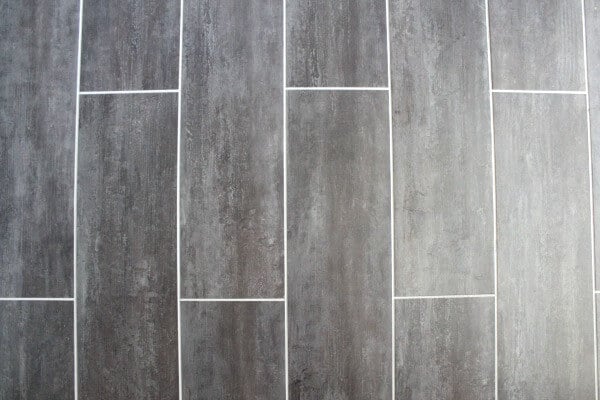
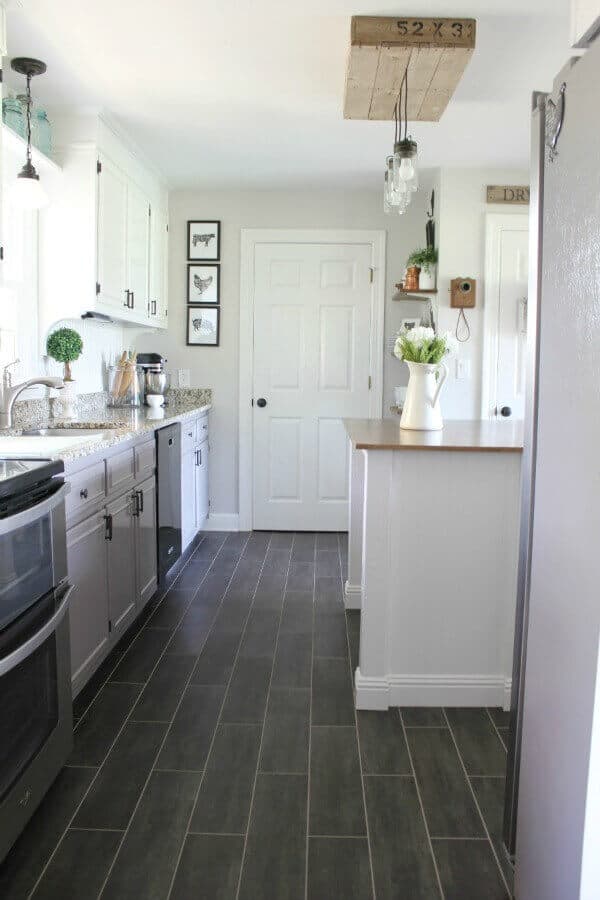
At last – she’s ready for the ball! Indeed, I wake up singing and cannot wait to enter my kitchen with her new, beautiful cinderella shoes!
Without question, I recommend these floors because they are durable, easy to clean, and soft underfoot. I also love that they don’t get cold overnight like ceramic tile does, which is nice on the tootsies early in the morn.

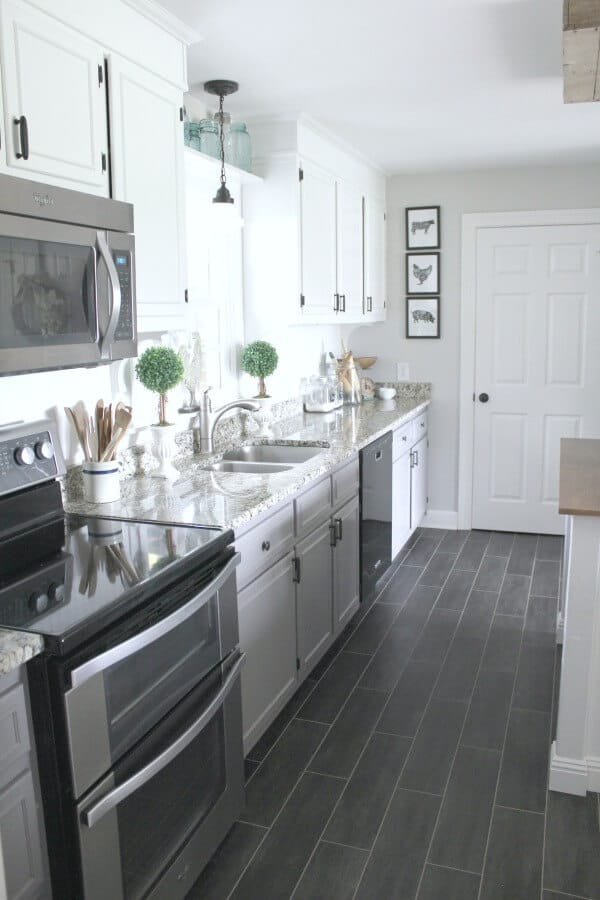
So what’s the bottom line? Would you believe me that we changed the look of this room for less than $400 and 3 days?!!
DIY Flooring Total Cost: $380
including the laundry/mudroom!
If you like this project, then you might want to find out about other projects in this room. I’ve provided some links for you:
Kitchen Makeover: See how we transformed this room here
Topiaries: DIY project: tutorial here
Pallet Light Fixture: DIY project: tutorial here
Farmhouse Kitchen Island: DIY project: tutorial here
I truly hope this inspired you to give this a try DIY Flooring for yourself. Below is an image you can pin for later and please spread the sunshine and share your DIY with me!



That’s a great question! We used a sharp razor blade to score – probably about 10 times, and then either snapped the piece in half, or scored all the way through.
Buy a lot of razor blades – they are super cheap, but worth the swap out every few tiles! Hope that helps!
Jen and Trent
love your floor. how did you cut the thin pieces up against the cabinets
Hey Lauren! Thanks so much for reaching out! I don’t think that would be an issue. We opted to put the floors under our appliances, but used scraps that may not look the best – but it wasn’t necessary.
I hope that helps! Good luck with your project!
Hi! Your floors look great! Is it necessary to put the floors underneath the appliances? I have old linoleum floors in my kitchen that I’d like to cover. Thanks!
Hi there,
Thanks for the inspiration. I did these floors after I saw your post back in February of 2017 they are still fabulous but have since felt like I need to really clean them well like a good cleaning grout and all. Any suggestions of what you use. After doing projects, kids walking and all it has taken a beating. Any help would be appreciated.
Hey Mina – thanks so much for taking the time to reach out! To answer your question, yes the peel and stick tile works as a temporary fix, but I highly recommend not grouting it for that reason. I also suggest getting permission from your landlord before applying anything.
When you do remove the tiles, you will probably have to use an adhesive remover to get rid of any residue left behind by the peel and stick tiles. There’s a few videos online that show how to remove peel and stick tiles. It’s very easy to do, but again – that’s without grouting the tiles.
I hope that helps! Let me know if you have any other questions!
Jen
Hi there! I love this hack, and as renters my husband and I are eager to try this out in our temporary home of the next 3 years.
Is this DIY rental friendly? Do we have to fill the grout around the tiles on the original flooring prior to laying the vinyl? And what is the process of removal? Hope to hear back more!
I love the products from Rejuvenate for Luxury Vinyl Tile. That works great on this type of flooring. And my best best for lightening the grout is to scrub it well. I need to find an easier way to do that!
Hi there so I did this floor in 2017 it’s
fantastic. I’ve had for about 5 years
now. I’m sure you have had longer. Any
good advice on cleaning the floor really
well…and getting the grout to be lighter
again? Any suggestions would be
awesome thanks!
Thanks so much, Clinton! And that’s a great question! Our main reason for applying over the floor was to save on time for the install as well as the messy cleanup. We chose a floor that specifically worked over existing laminate flooring. Another thing to consider would be the type of laminate flooring you have. Depending on the age, some may contain asbestos, so it’s safer to cover over it instead of ripping it up.
Hey- great write-up here. Quick question: what made you apply the new flooring on top of the old floor, vs. removing the old floor and then applying the new tiles?
I am so glad this helped you out, Autumn! Hope your floor turns out wonderful!
I lost this post on pinterest and have been looking for it ever since!! I just started my kitchen/dining room and found myself NEEDING this. It has been super helpful! Thank you!
Thanks Kris. We painted our walls with Crushed Ice from Sherwin Williams. It was a great neutral.
What color of paint is on your kitchen walls? Love the color. Your floors look amazing!
Hi Karen – thanks for the awesome questions! Our floors and grout held up wonderfully to the damage my two sons and at that time, a puppy, gave them! There is also a grout sealant on the market that you could apply that will help keep the grout looking new. Here’s an aff link to one I have used before. Hope that helps! Feel free to reach out again if you have any other questions!
We are wanting to redo our floors in kitchen & mudroom. We have replaced our LR, FR, BR’s & hall with hardwood but the way our home is configured I was afraid it wouldn’t look right going in to kitchen & mudroom. I love the luxury vinyls that are out there but can’t decide if I want to have grout. I realize things have changed a lot as far as the upkeep on grout & vinyl. You have had your floors for a few years now & have a larger family. I was curious what you have had to do to keep the grout clean. I am in my 60’s & don’t want to spend all my time cleaning like I use to when I was younger. So many floors also look like our hardwood just a different color. I am concerned that will look really bad. Our wood floors are a dark brown, almost mahogany. I love them. Have light gray tiles in the bathrooms & it goes well together. Help!
This flooring has a high moisture rating is ideal for kitchens and bathrooms. We haven’t had any issues!
Looks gorgeous!!!! I want to do this for a small bathroom my kids use. What about moisture?? Any issues?
That’s a great question Annie! The tiles have a slight give to them and I think they would work perfectly going toward a floor drain. We did these around our half bath floor and the toilet drain had a very slight slope to it and they worked perfectly.
Looks great! Do you remember if this peel and stick tile had any bend or flexibility to it? We are wanting to do something similar in our laundry room to cover up our old tiles. My only concern is that we have a floor drain in that room and it has a slight slope for that. Wondering how the tile will stick to the sloped area around the drain..
Thanks!
Hi! This project looks great! We’re updating our laundry room floor and wanting to do something similar. The only concern is our laundry room has a floor drain with a slight slope in the floor. Do you remember if this peel and stick flooring had some bend to it? Just curious how it will hold up sticking to a sloped area.
Thanks!
Hi Marie – thanks for reaching out! We have since moved from that house, but had the floors in place about 2 years before we moved, during which, our rowdy boys were always in and out with their friends. Not only that, but we also got a puppy during that time, and the floors held up extremely well! I would absolutely use these same floors again! Hope that helps!
Hey there, I was curious how the flooring has held up now that it has been a few years. I was already looking at this flooring when I came across your project, but many of the reviews state that the tile scratches easily which in our household, especially in our kitchen would not be a good thing. Thanks for the update.
Hey Colleen! Thanks so much for reaching out! The thing I love about the peel and stick tile is that it is easily replaceable. If a piece gets damaged, just swap it out for another one. With ours being grouted, you would have to remove the grout before removing the tile and then simply regrout after replacing it.
As far as whether it works for ceramic tile – I’m not 100% certain. You may want to reach out to the manufacturer just to be sure. IMO – I don’t see why it wouldn’t work, unless your ceramic tile is very textured, like travertine. You may be able to see that!
Thanks so much for reaching out! I have to say – I loved the dark floors for disguising dirt. Our boys would run in and out all day and it was awesome! But, we did have hard water, so initial water spots weren’t an issue, but if left to dry and sit, they turned cloudy white, like most hard water does, but wiping it up was a cinch.
The only other issue we noticed was with our white puppy. When he started losing his puppy coat, it wasn’t that noticeable on our hardwood, but boy did it stand out on those dark floors! But his cuteness made up for the extra sweeping we had to do. LOL
Hope that helps!
Hi,
I love the look of your floor and was wondering how well it hid dirt, dust, water spots, etc. I have light grey porcelain tile that was installed a couple of years ago but it shows EVERYthing, it drives me crazy. It would be ridiculously expensive to have it taken out so I’ve been thinking of ways to cover it. I tried a rug but that wasn’t the best solution and now think vinyl might be the answer. I just want to make sure I don’t wind up with the same problem of dirt and water spots showing like they do now.
Thanks!
Hi there!
I love your floors and would love to do this project over my ugly ceramic floors in my kitchen. I am wondering though, if a piece gets damaged how do you go about replacing it? And is this product recommended to go over top of ceramic tiles?
Thanks
Yes you can! The grouting is optional and have seen many beautiful rooms using this tile without the grout. Just make sure your floor is really clean first.
Hi! Trying to get inspired to cover OLD 1 inch tiles in bathroom. Don’t want to spend a lot of money and have never tackled a project like this. So, basically, I need a miracle 😉. Can I use these tiles without grouting? Other suggestions?
Thanks,
Ellen
Thank you Amy! We used Sherwin Williams Pure White for all the trim in this home. Hope that helps!
Thanks to you I’ve painted two rooms with crushed ice. What trim color did you use?
This is the best compliment! Thank you for taking the time to say such kind words. This is why I love doing what I do!
Jen!! I think you are my spirit sister!! Like you, I am always on the lookout for inexpensive fixes that look high end. I’m so thankful I found your amazing blog. You keep me thinking and going!!
Hi Stacy! Thanks so much for reaching out. To answer your questions, yes, you can place these tiles directly on the laminate floor. We simply prepped ours with a good cleaning beforehand. In regard to the timing of everything, I would suggest you replace the floor cabinets first and tile up to them. You would hate to do that work laying them down and maybe get scuffed in the construction process. Plus, it will look cleaner with a straight edge again the bottom on the cabinets. Hope that helps – let me know if you have any other questions.
Hello, I love your decor 🙂 Two questions I have:
1) Do I place the tiles on top of the pre-existing laminate flooring I have?
2) Do you recommend that I replace my counters/floor cabinets before I start work on my floors in the kitchen?
Wow, Naomi – I’m so sorry to hear about the flood and asbestos. Those are two things homeowners never hope to experience and I’m sorry that happened to you. To answer your question, I think the floor tiles would work with a threshold. The tiles are relatively thin and shouldn’t add much height to your floor. If you go to Lowe’s, I believe you can buy just one to take home and mock up how it would work. I also suggest you give Stainmaster a call to see if there is any additional prep work for your ceramic tile. It wouldn’t hurt to get all your homework done first! Those are great questions and I’m so appreciative you reached out. Good luck with your project – and if you go ahead with it, send me a pic of how it turned out! I’d love to see it!
Hey, I have a question. We have ceramic tile in our kitchen and throughout much of our house. We recently had a flood in a portion of our house and asbestos was found in tiles underneath the carpet. It appears that similar tiles exist under our kitchen tiles as well. We were planning on removing the tiles and redoing the floor. Well, now we’re trying to avoid the high price tag that comes with asbestos removal. I’m wondering if the vinyl you did would work for us to do over our kitchen tiles as well. I’m concerned it will raise the level of the floor in the kitchen. How thick is the vinyl? would a threshold solve the problem of the difference in floor height? What do you think?
That’s a great question Amanda! Thanks for asking. We didn’t remove the baseboards, but did remove all of the quarter round toe moulding. The pictures you see are with the toe moulding reinstalled. They are easy to remove and reinstall. In regard to the door trim, we had to cut some of the jambs to allow the tile to fit underneath. Hope that helps and feel free to reach out again if you have any more questions!
I had a question about how this met up to your trim. From some pictures it looks like you didn’t remove it (at least in some areas). How did the vinyl tile meet up on the sides against the trim?
Susan! You sweet comment made my day! This is why I blog and share our DIYs with you – in hopes to encourage and inspire! Thanks for taking a moment and letting me know that this tutorial helped. Send a pic – I would love to see the finished room!
Thanks so very much! This was such a great tutorial! It gave us the confidence to do our floors over. We used exactly the same supplies in our mud room redo. We just finished grouting and I’m already thrilled! All of your photos really helped! Thank you!
Hi Kori,
Great question! We moved from our TN home in September – which was almost 2 years to the date of install. They were well worn by 2 rowdy boys and a puppy and looked exactly the same as when we laid them down. I was super surprised and pleasantly pleased.
Hope that helps and if you stumble upon any problems with your project – be sure to reach out again. We’d love to help out!
How are these tiles holding up? I’m considering them for our kitchen and bathrooms.
The countertops were a replacement. We looked for deals and waited for a sale to happen at our local big box hardware store. While they weren’t my dream countertops, I enjoyed them knowing that I was able to afford them! Thanks for taking the time to ask your question and feel free to reach out anytime!
Thank you Tricia! So glad we have the same taste! Happy New Year to you!
Absolutely love the color combo in your kitchen. I’m wanting to do a very similar color scheme in my kitchen and plan to do all diy if possible. I currently have the hideous faux wood countertops. Did you paint your countertops or replace with new ones? Thanks in advance! 😊
Love the floors but then again I might be a little bias cuz they are the same floor and color I used in my laundry room
No, it doesn’t have to be grouted as long as the tiles are set flush against each other (without spacers). Thanks for taking the time to comment!
No damage whatsoever! We continued to be pleased with this flooring the entire time we lived here. I didn’t seal it and had lots of traffic with our two boys and dog. The only reason to seal would be to keep the grout in pristine condition.
This flooring looks exactly what I want for my whole house! I like to pull my fridge out a couple times a year to clean under it, and wipe down the walls and baseboards. Any problems or damage when moving the fridge at all? I noted you moved it back in place only 24 hours after final grouting. And Is the grout easily stained? Or do you have to seal it like for ceramic or porcelain tile?
Do the “groutable” tiles have to be grouted, or is that optional (without spacers, I’d assume.)?
I use a damp fiber cloth mop to clean the floors. Here is an affiliate link to ones similar to mine.
Fiber Cloth Mop
Hope that helps!
I absolutely love your floors! I’m definitely considering this for my kitchen but how do you clean them? I’m assuming mopping them would be too much water on them.
Josh – my apologies in not responding sooner! We are still loving the floors and even with 2 boys and a puppy – they are holding up exceptionally well. There is only one knick in the floor where my youngest dropped a glass and it broke, but it’s so small that I can hardly see it. I hope that helps and good luck on your DIY!
Looks great. How are the floors holding up? Looking to do something similar but concerned about durability.
Hi Merika – we were fortunate to have our flooring meet up perfectly, so our threshold is a grout line. If we had to have one, I would have opted for a wood one to match my hardwoods. Hope that helps!
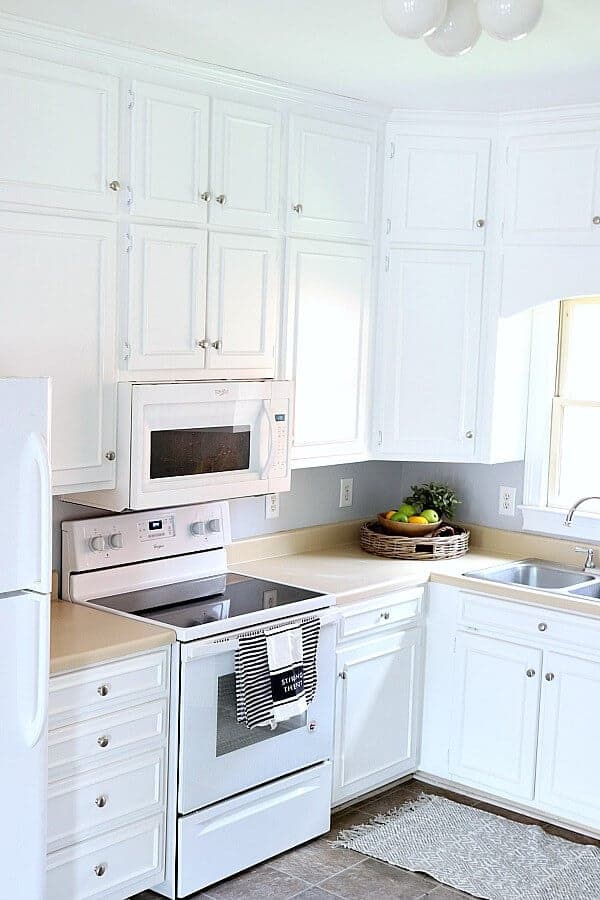
I painted my cabinets to save on costs. It wasn’t that difficult since they are just the facing, but I did paint the interior as well because the previous owner must have enjoyed some odiferous spices!
hey! i was wondering what you used for the transition to another flooring, since casa italia has no threshold option
Did you paint your cupboards or purchase new ones? I love the floor and the white cabinets really makes it stand out.
Jen, does this vinyl floor meet your wood floor at some point? Id love to see a oic of that transition!. We have oak wood floors but not in our kitchen and currently leaning toward thes vinyl ones but arent sure how it will look beside an oak floor.
Hi Nicole! Thanks for asking. It’s Luxury Vinyl Tile made by Stainmaster. The color is called Casa Italia and I purchased it at Lowe’s. The direct link to the exact product is in the post under the Materials Section. Hope that helps!
WHERE DID YOU GET THE FLOOR AND WHATS THE NAME LOVE!
Oh thank you so much! The wall color is by Sherwin Williams and it’s called Crushed Ice. Hope that helps!
The wall paint color is beautiful and a perfect accent to the tile and cupboards. What’s the color?
What a great question, Kelly! We’ve had our flooring installed for over a year, and we cannot see any bumps coming through at all. I suggest you stop by the flooring aisle the next time you are a your big box hardware store and see how thick these luxury vinyl tiles are – I think it would be difficult for that to happen. I hope that helps, and if you have any other questions – feel free to reach out anytime!
Quick question about laying over existing tile. Has the vinyl tile settled at all leaving bumps and lumps from the grout lines of the underlaying tile? I’d like to do the same in my bathroom but my husband and is concerned.
Thanks so much! It’s routable vinyl tile.
So, I’m a bit confused, even after looking at Lowe’s description. Is it vinyl tile or is it ceramic tile? It looks fantastic and the grout looks great.
Oh, that was a big oversight that I quickly amended. Our kitchen flooring is about 135 square foot – that’s about $2.80 a square foot. Hope that helps!
Did I miss it? .I was wondering how many square feet you covered? Giving a cost for a project of this sort only makes sense if we know the cost per square foot.
On another note; I DO DO love the final result. (I did paint the kitchen and bath vinyl in our former home and people always said “Oooh what is that flooring? It’s so pretty!” All I did was use one color of paint over the pattern and it held up wonderfully…several coats but it did last and was easy to clean.
Thank you so much Michelle! I am glad I could make you smile and am honored you took the time to comment. Thanks for stopping by!
No – it looks like tile, especially in person! I was afraid of that initially, but am so pleased with how it turned out!
Absolutely gorgeous! I love your sense of humor and honesty regarding the way projects “really” transpire. Great job, well done you!
Are you worried that not using random cuts made it look like sheet vinyl?
That’s great Debra! We’ve had ours for over a year now and they still look great – even with a puppy!
Mona – you are so sweet! Thank you for that compliment and thank you for taking the time to leave me such a sweet note!
Now you only have to apologize for having an awesome kitchen. Looks great I really love how far flooring has come along in recent times.
I have high end vinyl floors that look similar to yours except without the grout lines. They have a wood look instead of tile. I’ve lived with them for two weeks now and I love them. They are beautiful, soft underfoot, and easy to clean. I don’t have to worry about pet accidents.